

Outlook, en af de mest populære e-mail-klienter, bruges i vid udstrækning af både enkeltpersoner og virksomheder til at administrere deres e-mail-kommunikation. Over tid, den store mængde e-mails, der modtages og sendes, kan blive overvældende, gør det udfordrende at finde gamle e-mails.
Hvis du bruger Microsoft Outlook til at administrere din e-mail, du skal muligvis finde gamle e-mails. Dette kan være svært, hvis du ikke ved, hvor du skal lede, eller hvilke søgekriterier du skal bruge. Det kan også være en udfordring, hvis du jævnligt sletter dine e-mails. Heldigvis, Outlook giver flere funktioner og teknikker, der kan hjælpe brugere med at finde gamle e-mails hurtigt og effektivt. I denne artikel, vi vil udforske forskellige metoder til at hjælpe dig med at finde ældre e-mails og hvordan du finder gamle e-mails i Outlook og Office 365 ved hjælp af forskellige metoder.

Hvorfor kan jeg ikke finde mine gamle e-mails i Outlook?
Hvis du er et kontor 365 bruger, der er en god chance for, at du bruger Outlook-skrivebordsappen. Og hvis du bruger Outlook, det er sandsynligt, at du ikke kan se alle dine e-mails.
Dette skyldes, at standardvisningen for Outlook kun viser e-mails fra de seneste to uger. For at se gammel mail, du skal ændre dine visningsindstillinger.
Der er flere andre grunde til, at du måske ikke kan finde dine gamle e-mails i Outlook. En mulighed er, at du ved et uheld har slettet dem. For at tjekke om dette er tilfældet, gå til mappen Slettede elementer og se, om de er der. Hvis de er, du kan flytte dem tilbage til din indbakke.
En anden mulighed er, at du har arkiverede dine gamle e-mails. Outlook arkiverer automatisk e-mails over en bestemt alder, og du kan selv arkivere e-mails manuelt.
For at kontrollere, om dine e-mails er blevet arkiveret, gå til Arkiv-mappen og se, om de er der. Hvis de er, du kan flytte dem tilbage til din indbakke.
Sådan finder du gamle e-mails i Outlook-e-mail-klienten
Metoder til at finde gamle e-mails i Outlook
-
- Brug af søgefunktionen: Den hurtigste og mest bekvemme måde at finde gamle e-mails i Outlook er ved at bruge den indbyggede søgefunktion. For at få adgang til denne funktion, klik på søgefeltet øverst i Outlook-vinduet. Du kan indtaste nøgleord relateret til den e-mail, du leder efter, såsom afsenderens navn, emne, eller specifikt indhold. Outlook viser en liste over matchende e-mails baseret på dine søgekriterier, så du nemt kan finde den ønskede besked.
- Brug af filtre: Outlook indeholder avancerede filtreringsmuligheder, der giver brugerne mulighed for at indsnævre deres søgeresultater baseret på specifikke parametre. For at få adgang til disse filtre, klik på søgefeltet som nævnt tidligere, and then click on the “Search” tab that appears in the ribbon. Her, du kan filtrere e-mails ud fra kriterier såsom dato, afsender, emne, eller vedhæftede filer. Ved at angive de respektive parametre, du kan justere din søgning og hurtigt finde de nødvendige gamle e-mails.
- Sortering af e-mails efter dato: Sortering af e-mails efter dato kan være en effektiv måde at finde ældre e-mails i Outlook. Som standard, Outlook viser e-mails i den rækkefølge, de blev modtaget eller sendt, med de nyeste e-mails øverst. For at vende rækkefølgen og vise de ældste e-mails først, click on the “Received” or “Sent” column header. Denne omarrangering gør det nemmere at finde e-mails fra en bestemt tidsramme eller datointerval.
- Brug af mapper og undermapper: At organisere e-mails i mapper og undermapper er en anden nyttig metode til at finde gamle e-mails. Ved at oprette mapper baseret på specifikke kategorier eller projekter, du kan sortere og gemme relevante e-mails i overensstemmelse hermed. For at oprette en ny mappe, højreklik på din postkasse eller en eksisterende mappe, select “New Folder,” and provide a name for it. Når mapperne er oprettet, du kan manuelt flytte e-mails til de respektive mapper. Denne måde, du kan hurtigt navigere til den ønskede placering og hente ældre e-mails, når det er nødvendigt.
- Arkivering af e-mails: Arkivering af e-mails er en effektiv måde at rydde op i din indbakke, mens du stadig bevarer adgangen til ældre meddelelser. Outlook giver en automatisk arkiveringsfunktion, der automatisk flytter ældre e-mails til en arkivmappe baseret på specifikke kriterier, du definerer. For at aktivere automatisk arkivering, go to “File,” then “Options,” followed by “Advanced.” Here, du kan indstille arkivpræferencerne, herunder tidsrammen for arkivering. Når den er konfigureret, Outlook flytter ældre e-mails fra din indbakke til Arkiv-mappen.
Brug af søgemapper
Hvis du bruger Outlook på din Windows-computer, du kan søge efter tidligere e-mails i den installerede version af Microsoft Outlook, der er sat op til at sende og modtage Office 365 e-mails. Denne metode virker, hvis du ikke allerede har slettet den gamle mail og de data, du skal finde.


For at finde de e-mails, du har brug for, første, navigate to the “Folder” menu tab and click “New Search Folder”. In modern Outlook versions it is enough to click “Search Folders” and then “New Search Folder…” item.
In the “New Search Folder” window, scroll down to the “Organizing Mail” section and click “Old mail”.
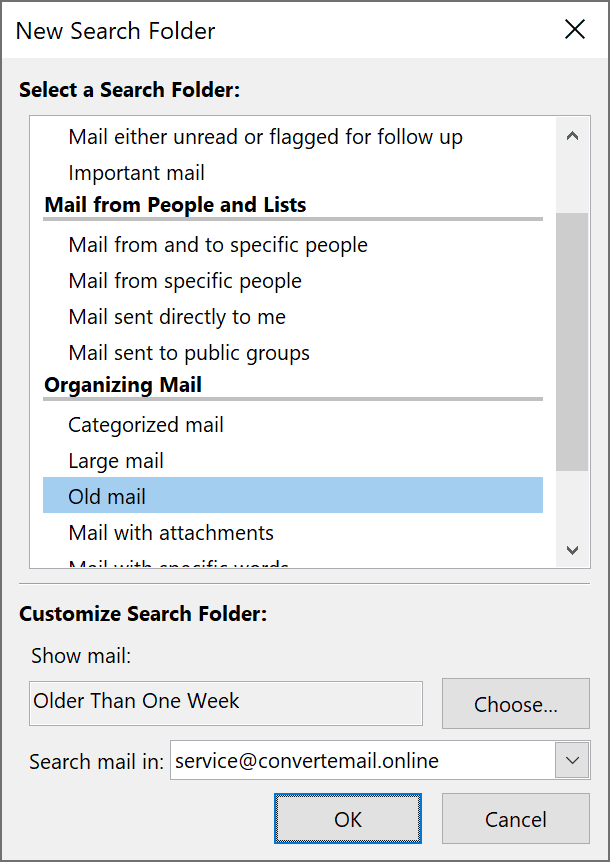

Når du har gjort dette, du vil være i stand til at vælge, hvor langt tilbage du vil finde data (fx, to uger, en måned, tre måneder, seks måneder, eller et år).
Efter du har foretaget dit valg, click “OK”, og søgningen begynder.
Derefter, gå tilbage til det primære vindue (that you were on before opening the “New Search Folder” option) for at se dine resultater, som vil blive vist i en separat mappe.
Derfra, du kan trække og slippe e-mail-beskederne i din indbakke (eller hvor du ellers ønsker at opbevare dem).
You can also save this search as a custom view that you can use again in the future by clicking the “Save as” button.
Som vi nævnte, dette er ikke en metode til at finde e-mails, der er blevet slettet permanent. Hvis du vil gendanne slettede elementer, du skal lære hvordan man finder gamle slettede e-mails i Outlook.
Brug af avanceret søgning i søgeværktøjerne
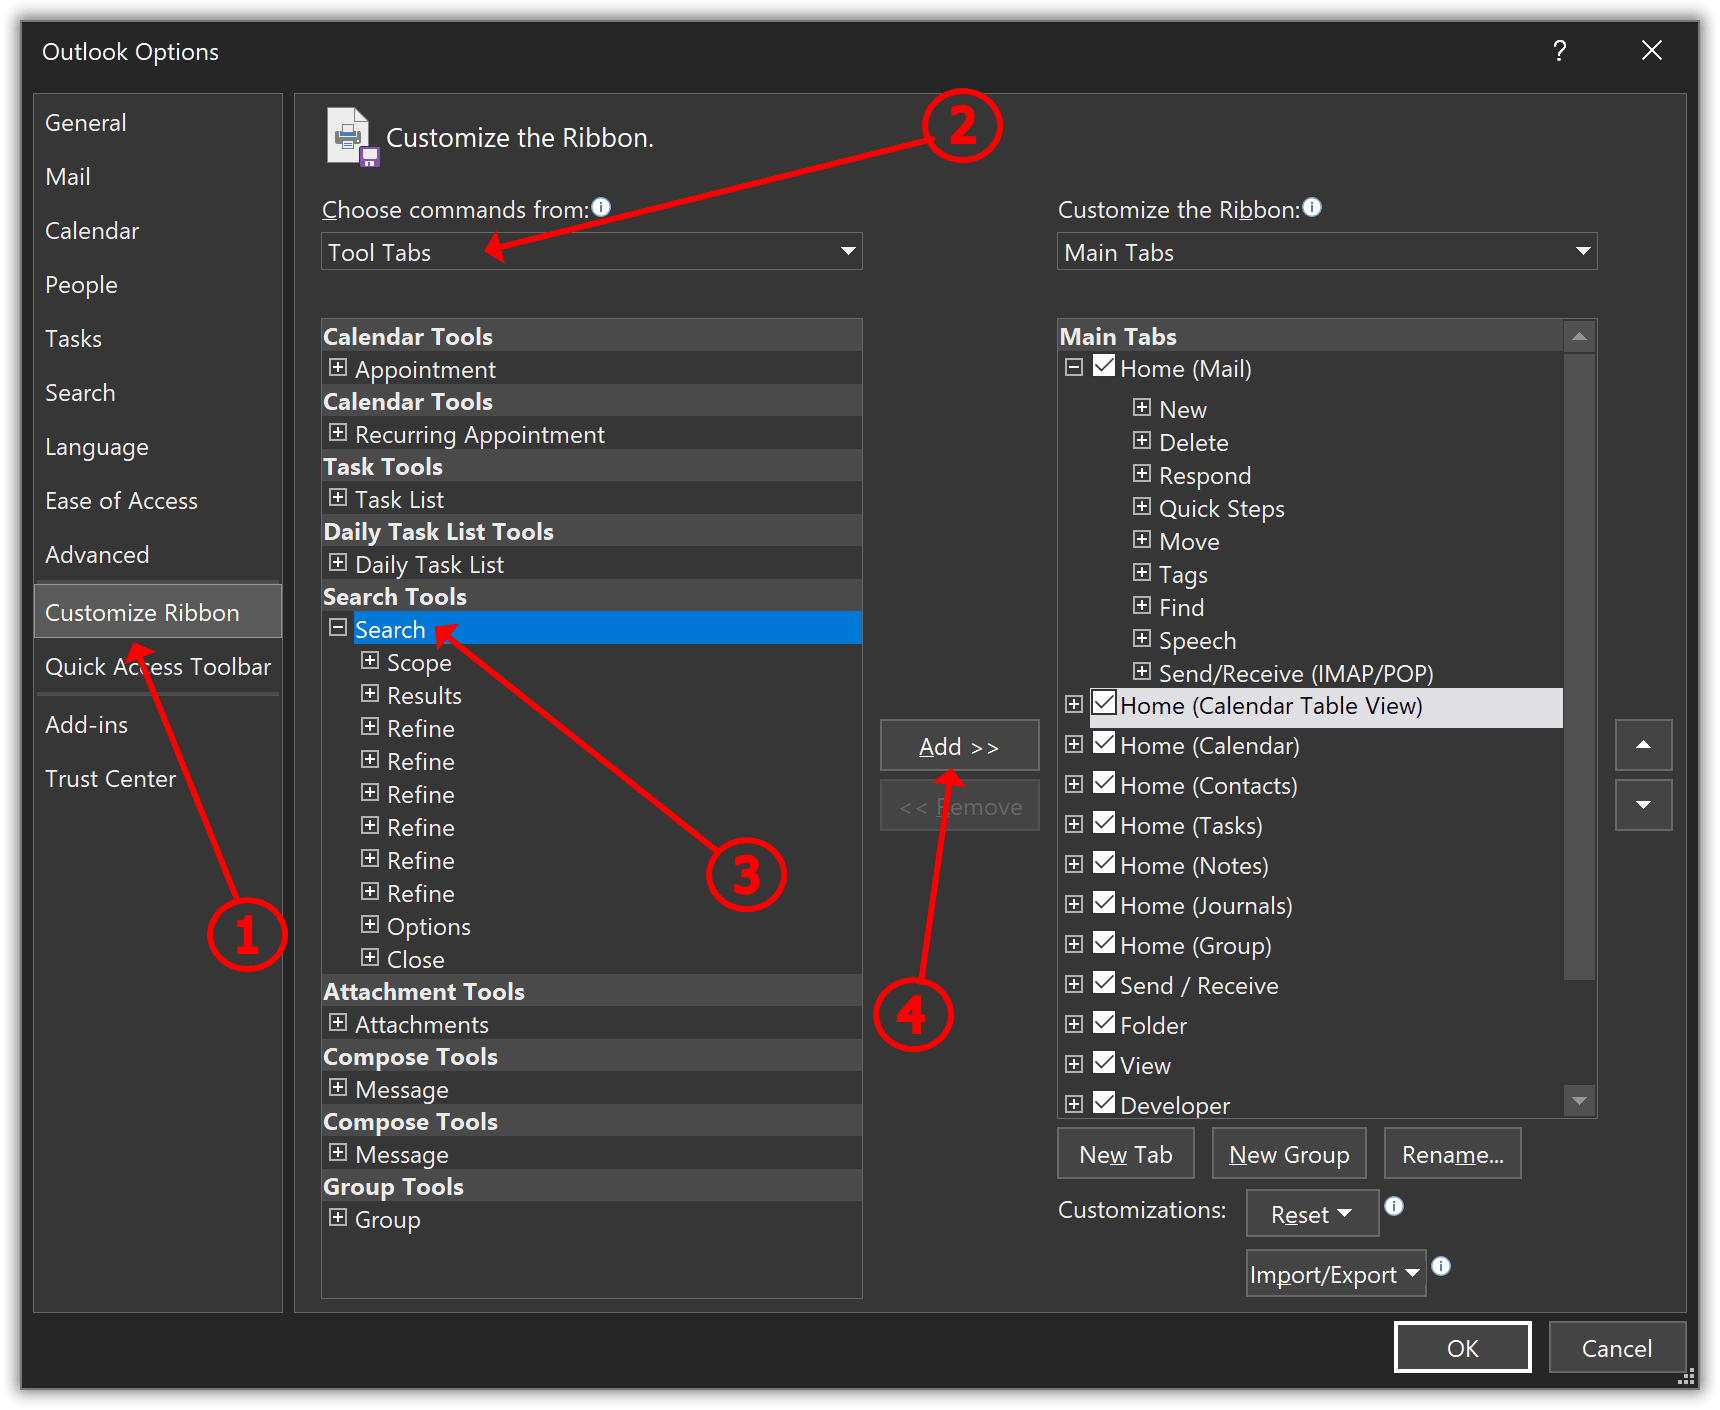
Outlook udstyret med en avanceret søgefunktion med flere kriterier. Denne funktion var i hurtig adgang i tidligere versioner af Outlook, men, du skal muligvis aktivere det med vilje, hvis der ikke er nogen fane Søg i dit Outlook-bånd. Her hvordan du gør dette:

-
- Right click to Outlook Ribbon and choose “Tilpas bånd” in the list of Options.
* – alternatively you may use menu File > Indstillinger - I "Vælg kommando fra:” list choose the “Værktøjsfaner" vare.
- Find "Søgeværktøjer” header below and click “Søg" vare.
- Klik på"Tilføje"knappen.
- Finally click “Ok” button to save changes.
- Right click to Outlook Ribbon and choose “Tilpas bånd” in the list of Options.
Now you could see the “Search” tab in the Outlook ribbon. Klik på den for at se de tilgængelige søgemuligheder.


You may use the Search Tools option to launch the “Advanced Find” engine where you may search Outlook emails by multiple criteria.

Alternativt kan du bruge Outlook-hjælperen (the search field “Tell me what you want to do”) for hurtig adgang til Søgeværktøjer eller for at starte Avanceret Søg.
Klik ind i hjælpefeltet eller tryk Alt+Q genvej og indtast navnet på den ønskede mulighed, klik derefter på den for at starte.
Sådan hentes gamle e-mails fra Microsoft Exchange Server
Microsoft Exchange-e-mail-tjenester er en populær mailserver, der bruges af virksomheder. Hvis du er en Exchange Server-bruger, du kan muligvis hente gamle e-mails fra selve serveren.
For at finde gamle Outlook-e-mails på denne måde, trinene er som følger:
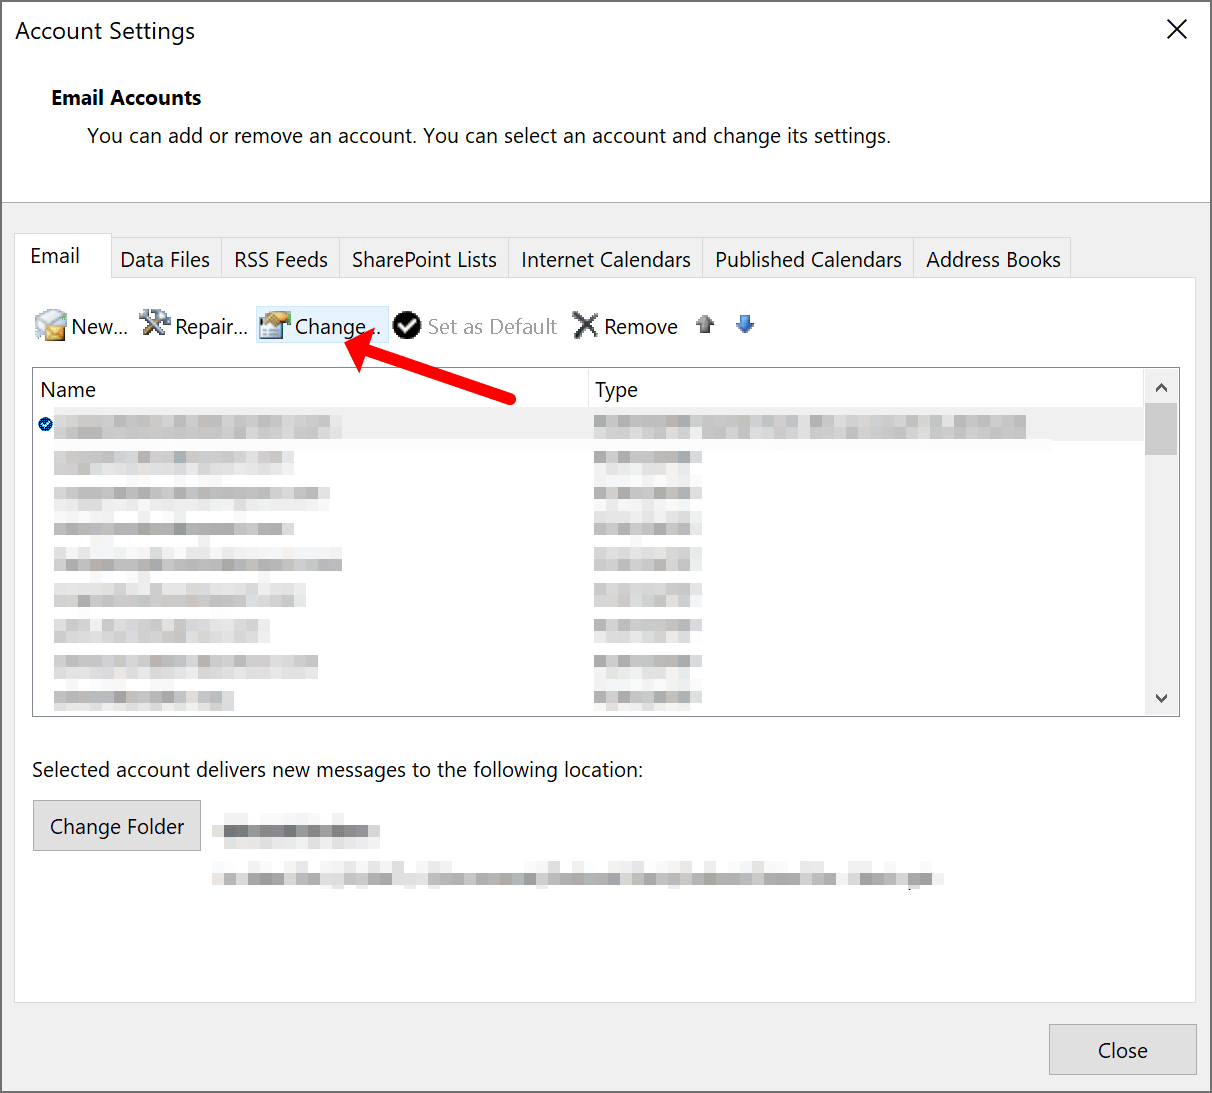
- Open Microsoft Outlook and click on the “File” tab.
- Derefter, select “Account Settings”.
- Næste, double-click on your Exchange account to open the “Change Account” window.
- In the “Change Account” window, go to the “More Settings” tab and click on the “Advanced” button. This will open the “Advanced Find” window.
- Du kan søge efter gamle e-mails efter dato, afsender, modtager, emne, eller andre kriterier.
- Når du har fundet de e-mails, du leder efter, du kan flytte dem til din indbakke (eller hvor du ellers ønsker at opbevare dem).
Du kan også eksporter Exchange-postkasse til PST-fil.
Tjek Cache Exchange Mode
Cache Exchange-tilstanden er en funktion i Outlook, der gemmer en kopi af din Exchange-postkasse på din computer. Dette kan være nyttigt, hvis du vil have adgang til dine e-mails offline, eller hvis du vil forbedre ydeevnen.
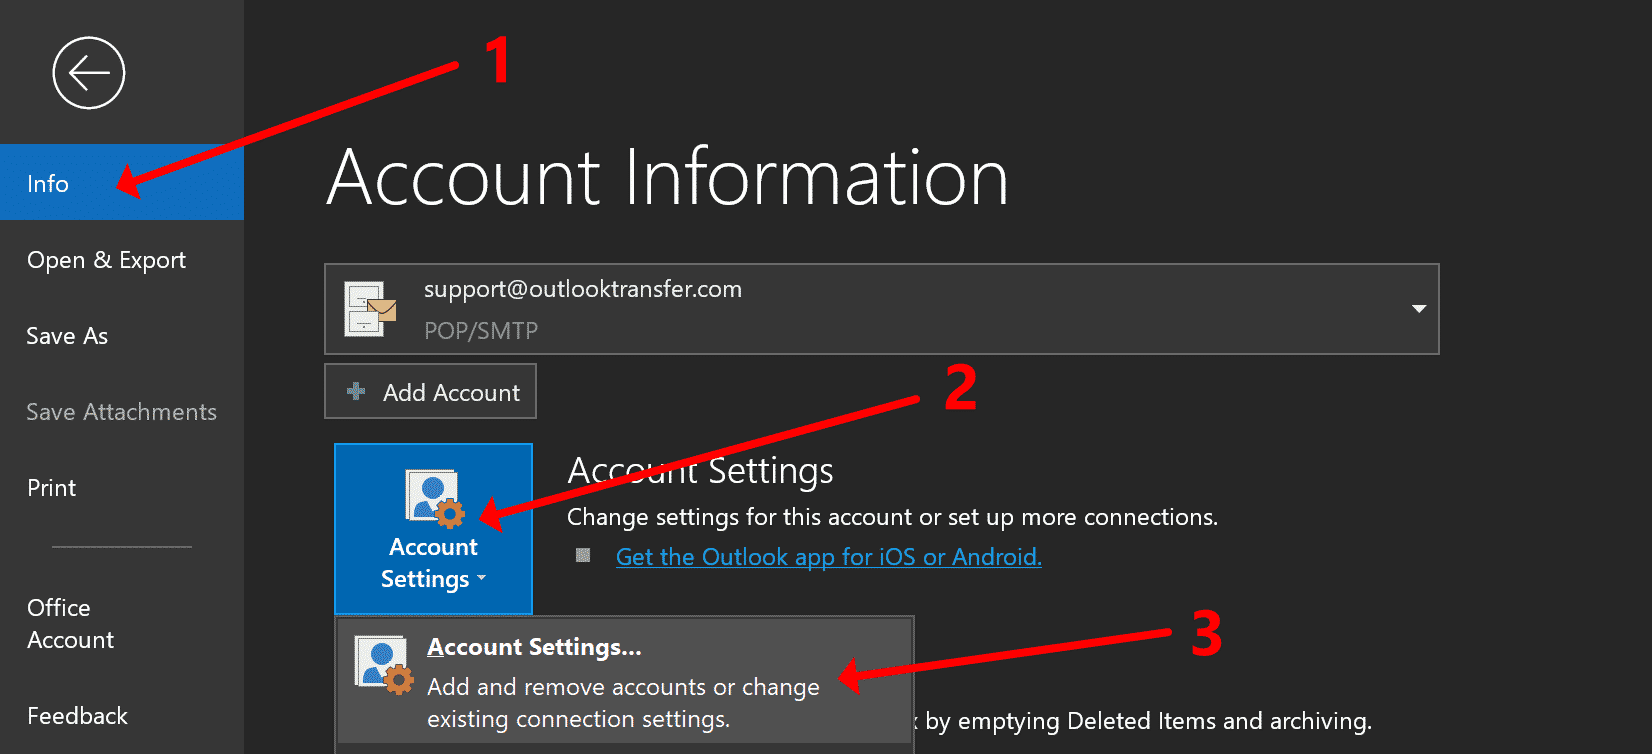

Men, Cache Exchange-tilstanden kan også forhindre dig i at se dine seneste e-mails. For at tjekke om dette er tilfældet, go to the “File” tab and click on “Account Settings.”
Derefter, double-click on your Exchange account to open the “Change Account” window or select your account name and click “Change…”

In the “Change Account” window, go to the “Advanced” tab and look for the “Offline Folder File Settings” section.
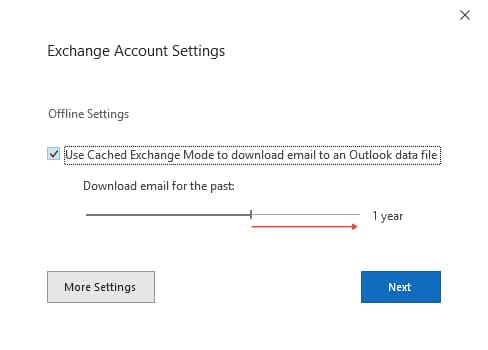

Til Exchange-konti, du kan ændre parametrene for Cached Exchange Mode, som kun er tilgængelige i det tilfælde. Outlook-klienter på Windows gemmer som standard e-mails på en computer i et år ved hjælp af lokal lagring.
Efter det, det lokale Outlook-klientlager ryddes for tidligere meddelelser. Skub drejeknappen til højre fra 1 år til alle. Følg derefter instruktionerne på skærmen for at afslutte konfigurationen og genstart af Outlook, hvorefter ændringerne skulle træde i kraft.
Efter det, dine gamle e-mails bør ikke slettes fra din computer i tre eller tolv måneder.
Sådan hentes gamle e-mails i Outlook Web Client
Hvis du bruger Outlook-webappen med Office 365, du kan finde dine gamle e-mails på flere måder.
Da nogle af dine gamle mails automatisk bliver arkiveret, it is best to start by checking the “Archive” folder. At gøre dette, click on the gear icon in the upper-right corner and select “Mail.”
Derefter, click on “Options” and select “See All Options.” Next, go to the “Mail” section and click on “Auto Archive Settings.”
Derfra, du kan ændre, hvor ofte du ønsker, at Outlook automatisk skal arkivere dine e-mails.
You can also manually archive your emails by selecting the emails you want to archive and clicking on the “Archive” button.
If they aren’t in the “Archive” folder, der er en chance for, at du har slettet dem. It is best to check the “Deleted Items” folder next.
Hvis du har slettet dem, og de er i denne mappe, you can select the emails and click on the “Recover Selected Items” button.
Du kan også finde gamle e-mails ved at søge efter dem. At gøre dette, klik på søgefeltet og indtast det du leder efter.
Skift opbevaringspolitikker
Opbevaringspolitikker bruges til at bestemme, hvor længe e-mails skal opbevares, før de slettes.
Du kan ændre opbevaringspolitikken, hvis du vil beholde din gamle post længere.
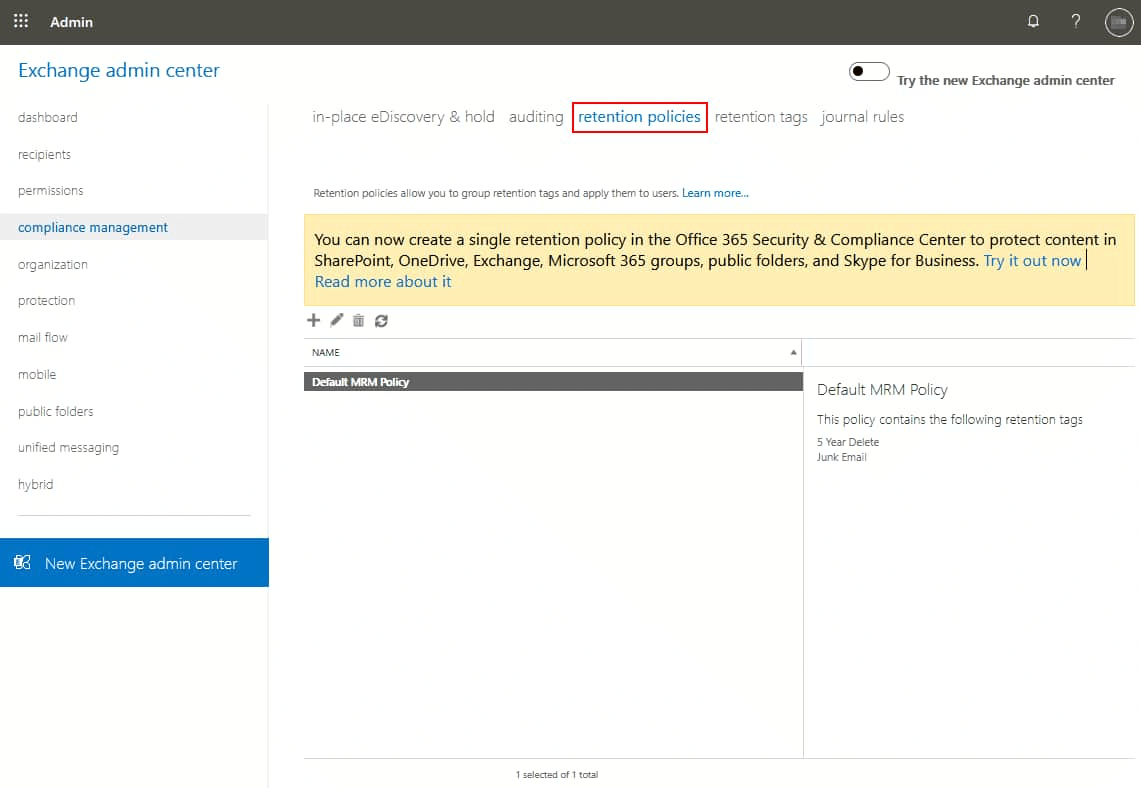

Første, open the Exchange Control Panel by going to “Compliance management.”
Derefter, click on “Retention Policies.” From there, du kan oprette en ny opbevaringspolitik eller redigere en eksisterende.
For at konfigurere den nye politik, select the “Do not delete items until they are older than” option and enter the number of days you want to keep emails.
Du kan også vælge at få e-mails slettet efter et vist antal dage eller uger. Eller lær hvordan man forhindrer Outlook i at slette e-mails i vores tidligere blogindlæg.
Når du har foretaget dine ændringer, click on the “Save” button.
Gendannelse af gamle e-mails fra en sikkerhedskopi
Hvis du har lavet en sikkerhedskopi af dit Office 365 data før e-mails blev slettet, du kan bruge den sikkerhedskopi til at gendanne dine gamle e-mails.
At gøre dette, open the “File” tab and click on “Open & Export.”
Derefter, click on “Import/Export.”
I det næste vindue, select the “Import from another program or file” option and click on the “Next” button.
Derefter, select the “Outlook Data File (.PST)” option and click on the “Next” button.
I det næste vindue, select the backup file you want to use and click on the “Open” button.
Derefter, select the mailbox you want to import from the backup file and click on the “Finish” button.
Du kan også udføre et Kernel Office 365 backup. At gøre dette, download og installer Kernel Office 365 Backup & Gendan værktøj.
Når det er installeret, open the tool and select the “Backup” option.
I det næste vindue, select the mailbox you want to backup and click on the “Add” button.
Derefter, select the location you want to save the backup file to and click on the “OK” button.


Choose “List all mailboxes” to back up all the mailboxes in your Office 365 konto.
Brug de ønskede filtre til at filtrere postkasseelementerne efter dine behov, og klik dig igennem den guidede proces
Sikkerhedskopieringsprocessen starter nu. Når den er færdig, du vil have en PST-fil, som du kan bruge til at gendanne dine gamle e-mails.
Eksempel, hvordan man finder mail fra indeværende år
Outlook vil nu vise alle e-mails modtaget i det indeværende år.
Konklusion
Der er et par forskellige måder, du kan finde gamle e-mails i Office 365. Chancerne er, din gamle mail er enten arkiveret eller for nylig slettet.
Men, hvis du ikke kan finde dine gamle e-mails, du kan prøve at ændre opbevaringspolitikken eller reparere slettede meddelelser vha gendannelsessoftware eller gendan dem fra en sikkerhedskopi.
Ofte stillede spørgsmål
Sletter Outlook gamle e-mails?
Om kontor 365 sletter gamle mails eller ej afhænger af, hvordan du har Outlook konfigureret. Som standard, Outlook sletter ikke gamle e-mails, men det har en mulighed for at arkivere e-mails automatisk efter en vis periode. Hvis du har denne mulighed aktiveret, dine gamle e-mails bliver flyttet til en arkivmappe og vises ikke længere i din indbakke. Du kan stadig få adgang til dem, hvis du har brug for det, men de vil ikke længere fylde din indbakke. Ultimativt, hvorvidt Outlook sletter gamle e-mails er op til dig.
Hvor længe gemmer Outlook e-mails?
Dette afhænger af, hvordan du har konfigureret Outlook. Som standard, Outlook sletter ikke gamle e-mails, men det har en mulighed for at arkivere e-mails automatisk efter en vis periode. Hvis denne indstilling er aktiveret, dine gamle e-mails bliver flyttet til en arkivmappe og vises ikke længere i din indbakke. Du kan vælge en hvilken som helst tidsramme for e-mails, der skal arkiveres.
Hvordan finder jeg gamle e-mails i Outlook efter dato?
For at finde gamle e-mails i Outlook efter dato, open the “Search” tab and click on the “Avanceret Søg"valgmulighed. Derefter, vælg den postkasse, du vil søge i, og indtast det datointerval, du vil søge efter. Click on the “Search” button, og alle e-mails fra dette datointerval vises. Du kan derefter rulle gennem resultaterne og finde den e-mail, du leder efter.
Hvordan får jeg Outlook til at vise alle mine e-mails?
Hvis du ikke kan se alle dine e-mails i Outlook, det er sandsynligvis fordi de på en eller anden måde bliver filtreret. For at rette dette, open the “View” tab and click on the “Show as Conversations” option. Dette vil vise alle dine e-mails på en liste, uanset om de er en del af en samtale eller ej. Hvis du stadig ikke kan se alle dine e-mails, et filter kan skjule dem. For at rette dette, open the “View” tab and click on the “Change View” option. Derefter, select the “All Messages” option from the list of available views. Dette vil vise alle dine e-mails, selv dem, der er skjult af et filter.