While Gmail is considered one of the best email clients certainly for a reason, users who switched to Gmail after Outlook often experience troubles getting used to it. Different approaches to messages view, filters, searching and other aspects make it hard for an long-time Outlook user to fully embrace Gmail as it deserves. Now, this article bridges the gap and teaches you how to make Gmail look and feel more like Outlook.
Why would anyone want to turn Gmail to Outlook?
We can easily come with at least two reasons.
- Users who worked with Outlook for years and then were forced to migrate to Gmail often find Gmail’s interface and approach to functions counter-intuitive. Of course, it is not really so. But teaching the old dog new tricks can be hard, so why not configure Gmail to look like Outlook instead?
- Another possible reason is when a user uses both email clients, but on different computers. For instance, Gmail at work and Outlook at home. This way it may be handy to make both clients function similarly.
10 ways to modify Gmail to make it look like Outlook
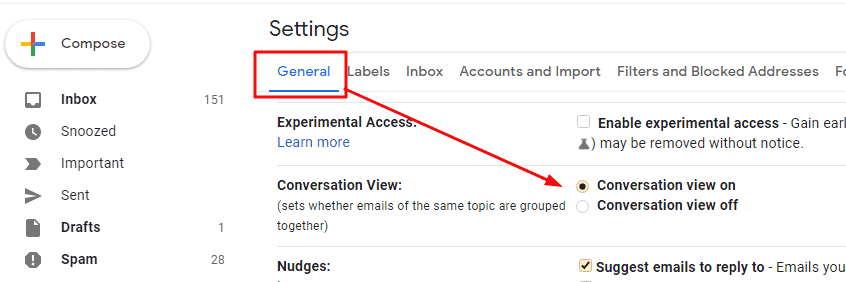
1. Turn off Conversation view
Not a unique feature of Gmail, but still a controversial function, conversation view is what many Outlook users find inconvenient in Gmail. Fortunately, you can easily turn message view to plain display without grouping emails into conversations.
In Gmail, click the gears icon in the top right corner:
![]()

The Quick Settings pane will open. Scroll it down and turn off “Conversation view”.
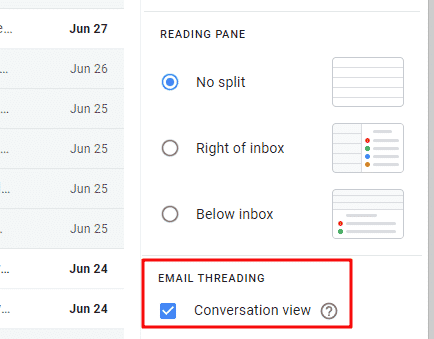

If for some reason you do not see this setting on the Quick Settings pane, you can click the “See all settings” button on the Quick Settings pane to open the Settings window. Switch to the General tab, then scroll down to the Conversation View section.

2. Enable Outlook-style Preview pane
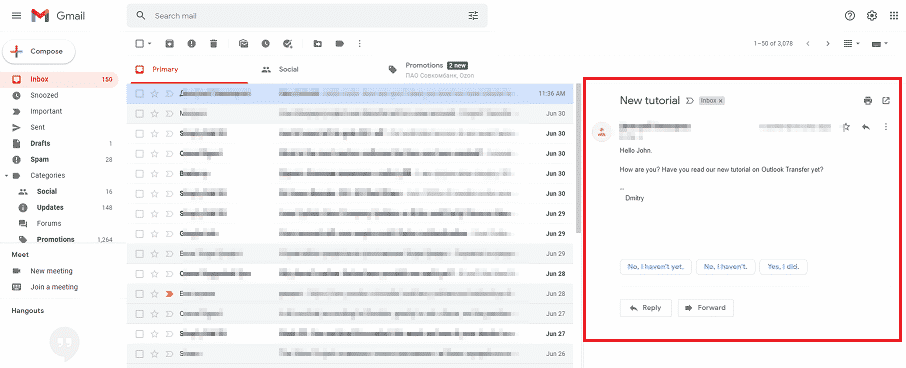
The Preview pane or the Reading pane in Outlook allows a user to quickly preview message text after he or she selects an email in the list without actually opening that message in a new window. The Reading pane in Outlook can be displayed at the right side or at the bottom.
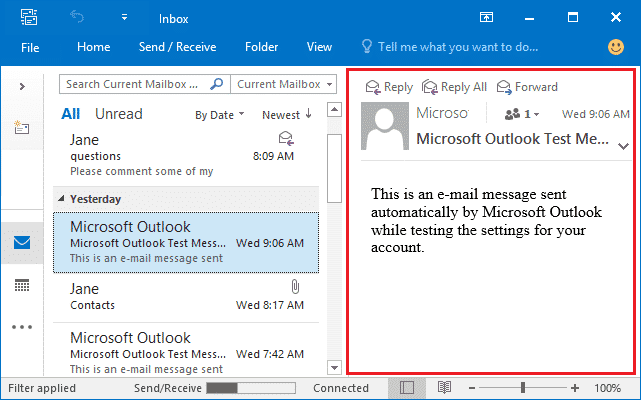

Switching to Gmail leaves long-time Outlook users disoriented: where is the Preview pane? Why should I click the Back button just to continue reading the rest of my Inbox? Why is it so complicated?! Don’t worry – you can enable the Preview pane in Gmail too. Here is how.
Start with click the Gears icon in the top right corner.
![]()
Scroll down the Quick Settings pane until you see the Reading pane option:
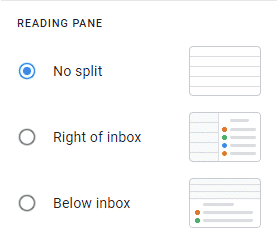

Select the option you want, reload the page, and here you are: Gmail looks a bit more like Outlook now.

3. Make Gmail open the compose window full-screen
You too hate this tiny reply window in the corner? Do you want to make it look as it is in Outlook – full screen? Catch the step-by-step instruction then!
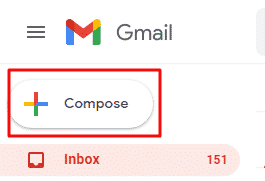
Step 1: Click the “Compose” button.

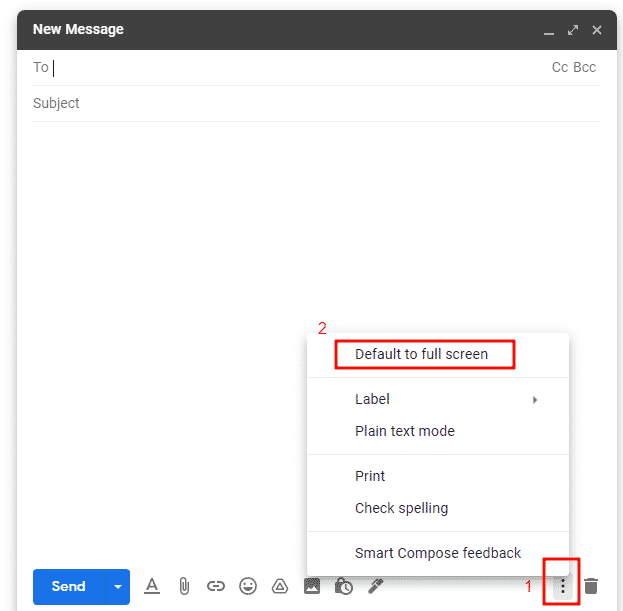
Step 2: In the New message window, click the “More options” button, then select “Default to full screen”.

That’s it! Now, every time you compose a new message, the editor will open full screen.
But wait! Clicking Reply still brings up that tiny gnome-sized window. Aaargh! And there is no “Default to full screen” option now. What can you do? Unfortunately, Gmail is rather inconsistent in its behavior. Turns out, you cannot configure Gmail to pop out the reply window full screen automatically. But there are three workarounds:
- Hold Shift and click the Reply button. This makes Gmail open the composer window full screen. Works with new messages too – just click the Compose button while holding Shift.
- While the above method is simpler, there is another one. Reply to an email as usual, then click the down arrow near the “Type of response” button:
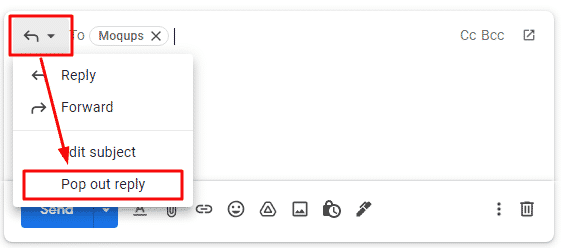

Unfortunately, you will need to make these two clicks every time your reply to a message.
- Finally, you can install a third-party extension to your browser that will add auto-reply-pop-out functionality to Gmail.
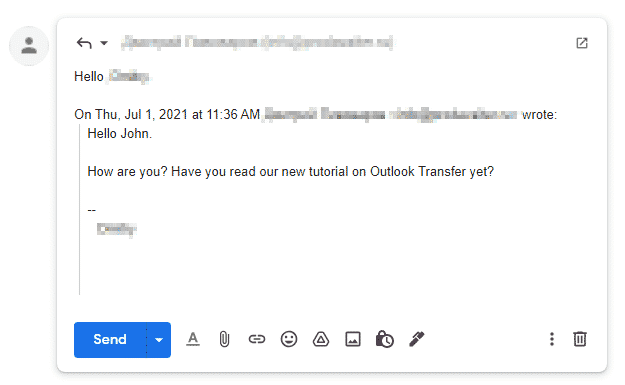
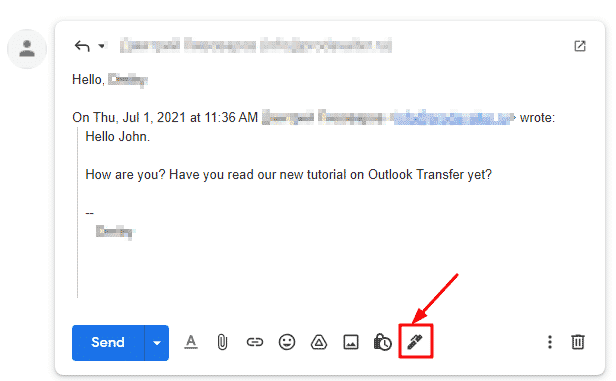
4. Show the message you reply to below your answer
Surprisingly many people get confused by this. Whether this is an intended Gmail behavior, or a UX blunder, the previous email is not displayed in the reply window outright. Supposedly, this is done to reduce the amount of visual “garbage” on the screen. Don’t forget – the default reply window is rather compact to say the least. But in some situations this could be really annoying.
Nevertheless, the text of the previous message is right here, in the reply window. It is just hidden. See those dots in the bottom? Click them.
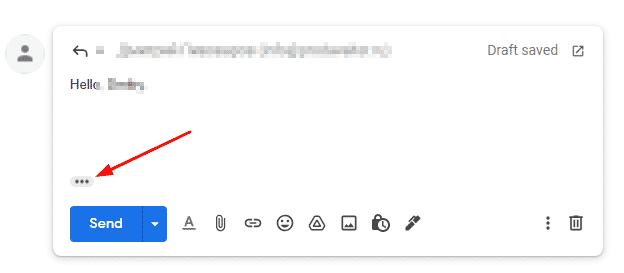

Voila! The previous message is now quoted as usual, just below your reply.

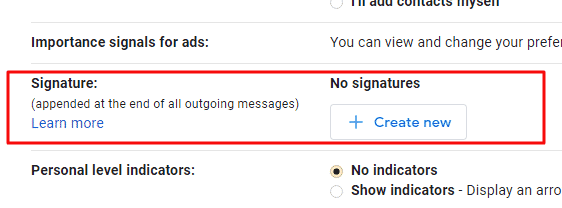
5. Add a signature to your emails in Gmail like in Outlook
Signatures in Outlook are definitely a great feature, but many users are mistaken thinking Gmail lacks this. To setup a signature in Gmail, follow these steps:
Step 1: Click the Settings icon.
![]()
Step 2: Click “See all settings”.
Step 3: Scroll down to the “Signatures” section and click the “Create new” button.

Step 4: Type your signature and format it according to your vision.
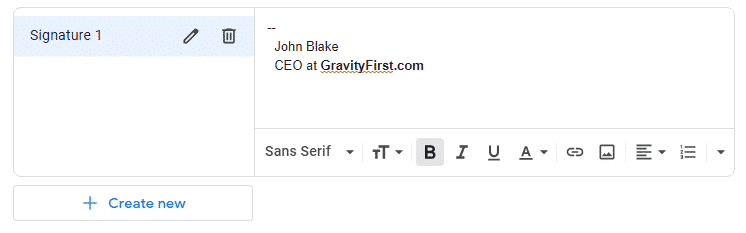

You can create as many signatures as you need.
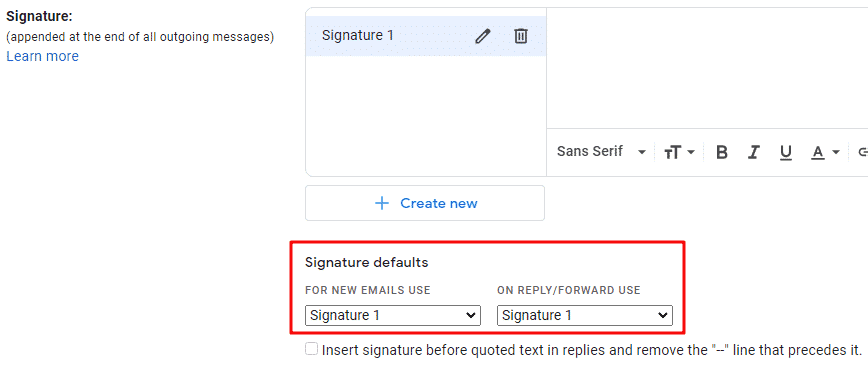
Step 5: Assign a default signature to new messages and reply/forwarding.

Step 6: Click “Save changes” at the bottom of the Settings page.
To manually insert a signature to the message, click the “Insert signature” button at the bottom of the reply window.

6. Replicate the Focused Inbox feature of Outlook in Gmail
Outlook 2016 brought in an excellent feature admired by thousands of Outlook users – Focused Inbox. What’s the deal? Based on your own open rate for various types of emails and on open rates of other users (if using Outlook.com), Outlook divides messages in the Inbox onto two parts: Focused (i.e. important), and all the other. This allows a user to quickly review what seems vital and requires priority attention, and then inspect other messages at leisure.
Gmail has its own way to organize emails to allow its users to quickly see important messages first.
Step 1: Open the Settings page ( -> “See all settings”).
Step 2: Switch to the “Inbox” tab.
Step 3: Turn on categories you would like Gmail to sort incoming message to.
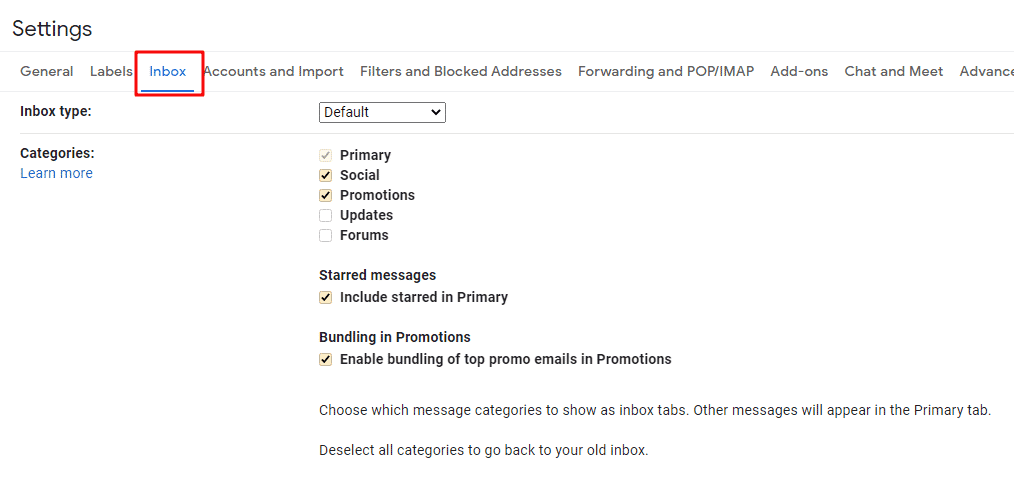

Gmail automatically detects Social messages, Promotions, Updates and Forums. The Primary category has private messages and emails not sorted to other tabs. In other words, the Primary tab is an analog of its Outlook counterpart – the Focused Inbox. There are really not too many differences.


7. Use Labels as a replacement to Outlook folders
While Outlook relies on folders as a primary instrument to manage emails, Gmail uses another approach. The Labels feature allows a user to apply a label – or a tag – to any message and then quickly filter these tags or search through them.
Functionally, labels are even more powerful than folder, because a message can only be in one folder at a time, but you can assign any number of labels to it. However, this feature will need some time to get used to if you only worked with Outlook folders before.
Here is how you can setup labels in Gmail.
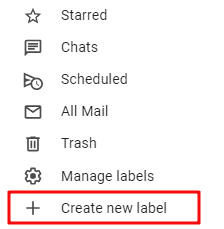
Step 1: To create a new label, click “Create new label” link in the left panel.

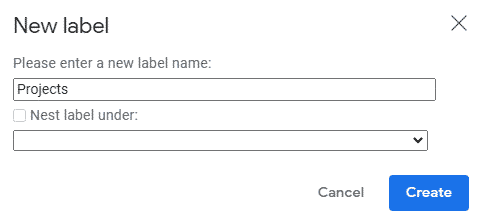
Step 2: Enter the name of a label and click Create.

The new label is displayed in the Labels tab of the Settings page. You can quickly open this tab by clicking the “Manage labels” link in the right panel.


Step 3: To assign a label to a message or a conversation, select it, then click the “Labels” button on the top bar. Select labels you want to assign to this message and click Apply.
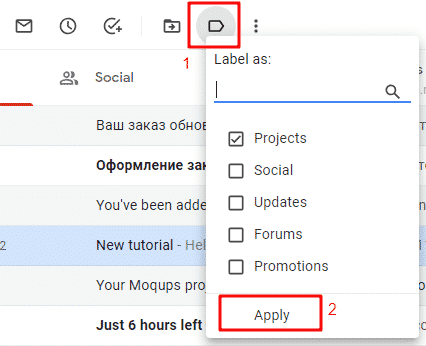

To show all messages with a certain label, simply click its name in the right panel.
8. Assign labels to emails automatically
Ok, labels are great. But can Gmail just filter the incoming email and assign specific labels automatically? Yes, you can configure Gmail to do so.
Let’s assume you have already configured labels you need. Now, follow these steps:
Step 1: Click the “Show search options” button near the search box on the top of the page. This will open the filter settings panel.


Step 2: In the filter settings panel, type filter conditions that should trigger the label, then click the “Create filter” button.
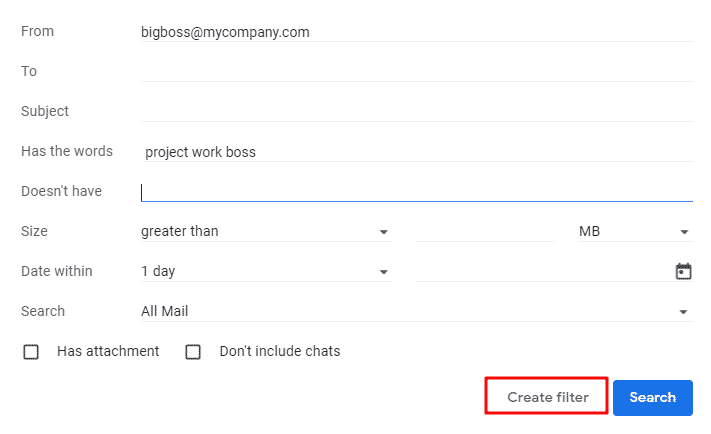

In the above example, we want to label all messages from the Big Boss that has certain keywords in it as “Projects”.
Step 3: Select the label to assign if the message matches the filter conditions. Click “Create filter”.
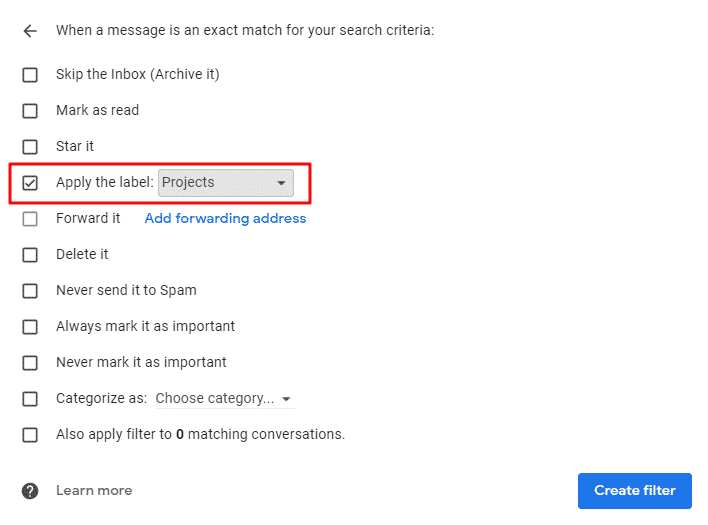

Now, all new messages you receive are assigned with the label and are filtered accordingly. This function works very much like Outlook Rules, helping you getting used to Gmail faster.
9. Assign colors to Gmail labels
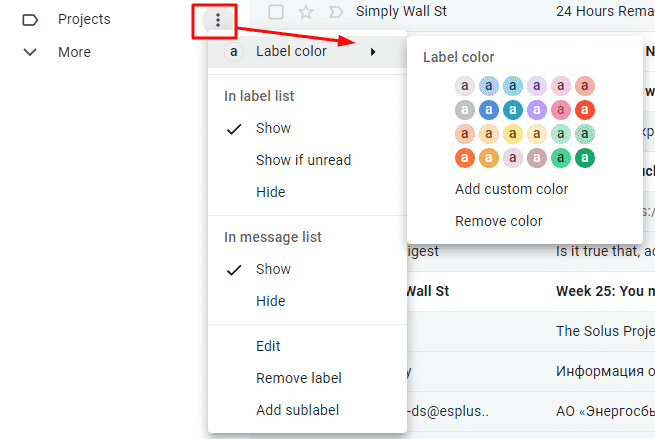
By the way, did you know you can color-code various labels to make them stand out or grab attention quickly if they mean something important? It is simple.
Click the three dots button just left of the label name:

10. Redefine Gmail keyboard shortcuts
Hot keys are one of those simple things that boost productivity multifold! But when you have just migrated from Outlook to Gmail, your old habits do not work anymore. Send an email with Ctrl+Enter? Switch to Inbox with Ctrl+Shift+I? At first, it seems nothing is working in Gmail as it should! You may even think about migrating back from Gmail to Outlook then.
Don’t panic. They are keyboard shortcuts in Gmail, of course. More over, you can even customize them and make them match those hot keys you use in Outlook.
To enable hot keys, you will need to open the Settings page, select the General tab and find the “Keyboard shortcuts” section:


Enable shortcuts and Save settings. Now you can use them in your work.
You can learn about default keyboard combinations here. And if you want to redefine some hot keys to match those of Outlook, please read further.
To enable hot keys customization, follow these steps:
Step 1: Make sure the keyboard shortcuts are enabled (see above)
Step 2: Go to the “Advanced” tab on the Settings page. Enable “Custom keyboard shortcuts”.


Step 3: A new tab should appear on the Settings page. If it doesn’t switch to the General tab again, and click the “Save settings” button.
![]()

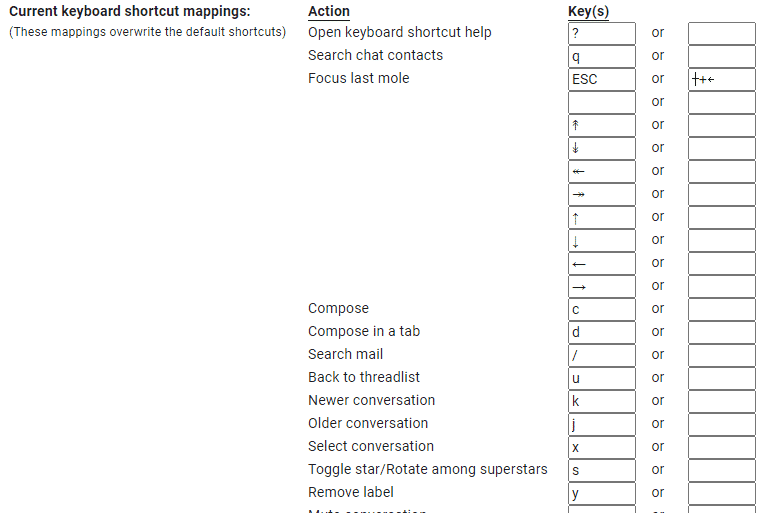
Switch to the “Keyboard Shortcuts” tab and configure hot keys as you want.

Conclusion
As you see, Gmail can really mimic many of the best Outlook features. Sometimes, it even does this better. However, if you still prefer Outlook, there is no problem. It is a great email client too, and many users transfer they emails to Outlook from Gmail, not the other side.
Just find an email client that’s best for you and use it with pleasure!
More Knowledge Base articles