Outlook is notorious for its HTML rendering. The system is relatively hostile to the coding, which is why “Send HTML email Outlook” is a common search query. Given the variety of versions, how can you do it properly? Marketers adapt their messages to Outlook. This system is used by millions.
You can be sure a share of your audience reads messages on Windows. Mail recipients are annoyed by broken links and missing images. These may trigger a flow of un-subscriptions. What started as a thoughtful marketing campaign may cause your audience to shrink. Plain text will not receive much attention.
This is why professionals use HTML in Outlook. Colorful messages in HTML are now the marketing standard. If you have a template ready, it is easy to insert HTML into Outlook.
HTML to Outlook Tool: The Simple Tool to Insert and Send HTML Emails in Outlook
Easily Load and Send HTML Emails with Microsoft Outlook
If you are looking for a way to insert HTML into Outlook emails without losing formatting, HTML to Outlook is the solution you need. Unlike manual copy-pasting, which often breaks designs, this tool ensures that your HTML emails remain intact and professional. Therefore, it simplifies your workflow and saves time.
This HTML email tool for Outlook enables users to load, edit, and send HTML emails effortlessly. Whether you are a marketer designing campaigns or a professional sending branded emails, this tool makes the process straightforward. Additionally, its lightweight design ensures quick and seamless performance, so you can focus on creating stunning emails.
Whether you’re a business professional, marketer, or developer, this HTML email tool for Outlook makes the process fast, reliable, and effortless.
Why Chose HTML to Outlook tool?
Unlike manual methods that require copying and pasting into Outlook’s email editor, often causing formatting issues, HTML to Outlook tool ensures your HTML emails look exactly as intended.
Effortless Integration with Outlook HTML to Outlook tool eliminates the challenges of creating HTML-based emails in Microsoft Outlook. Instead of manually inserting code, this tool does the heavy lifting for you. Therefore, you can focus on your message rather than technical details.
Preserve HTML Formatting Often, manually copying HTML content into Outlook results in broken formatting. However, this tool ensures your HTML layout is preserved perfectly, maintaining the email’s design.
Automation at Its Best By using command-line parameters, HTML to Outlook automates repetitive tasks. For example, you can instantly load an HTML file, open it in Outlook, and even close the program automatically. Thus, it is ideal for users who want to save time and streamline their workflow.
This tool eliminates common problems with HTML email formatting, making it perfect for professionals and businesses who need to maintain high-quality email design without complicated workarounds.
Load HTML Files – Open and view existing HTML email designs directly within the program.
Insert HTML into Outlook Email – Send emails with precise HTML formatting in seconds.
Save as Draft – Not ready to send? Simply save your HTML email in the Outlook Drafts folder.
Command-Line Execution – Use automation to load and send emails without manual steps.
Lightweight and Efficient – Get started in seconds without complex installations.
How It Works
Using HTML to Outlook is easy:
Step 1: Load Your HTML Email
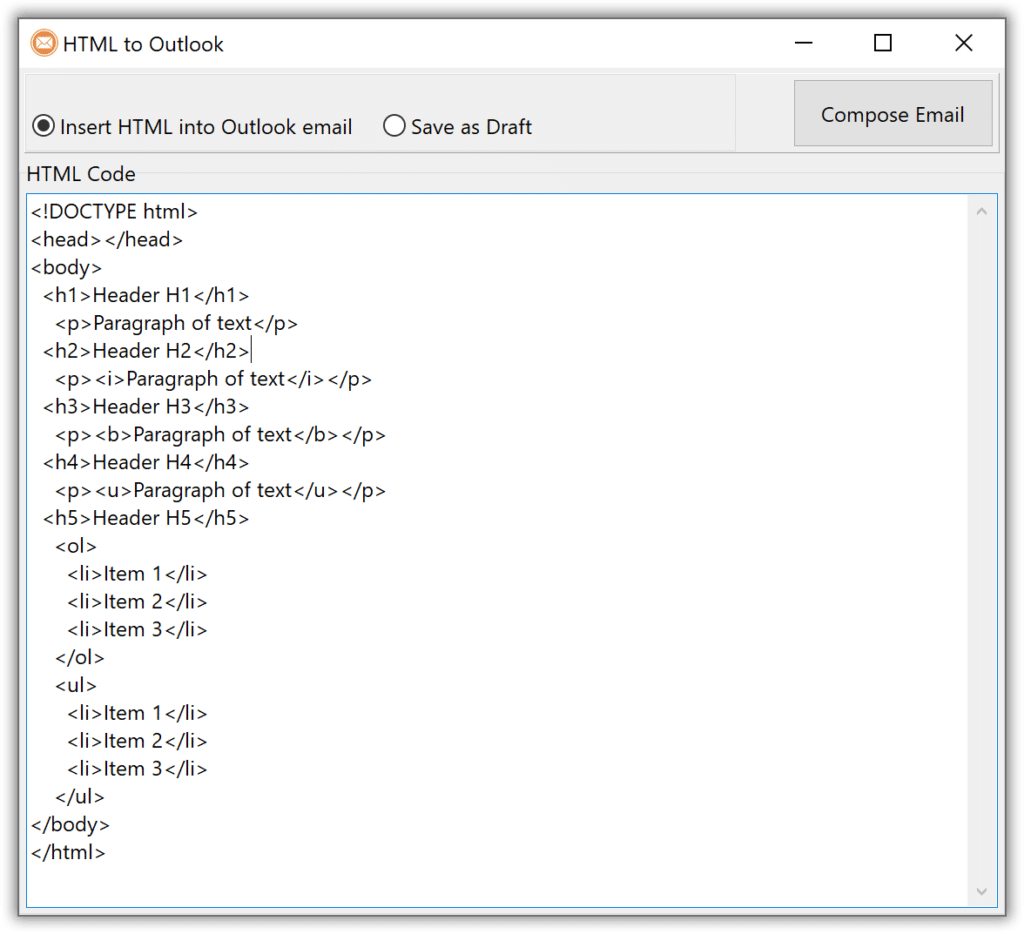
You can paste HTML code into the built-in editor or load an existing file. Therefore, you always have flexibility in how you use the tool.
Step 2: Choose Your Preferred Action
Once your HTML is ready, select what you want to do next:
a. Insert HTML into Outlook email by opening it in a new Outlook message.
b. Save it to Drafts if you need to review it later.
Step 3: Automate When Necessary
If you prefer automation, use the command-line options:
HtmlToOutlook.exe "C:\path\to\file.html"
This instantly loads HTML into Outlook and opens a new email without any manual intervention.
HtmlToOutlook.exe "C:\path\to\file.html" /e
As a result, the tool loads HTML, opens Outlook, and closes itself.
Why This Tool Stands Out
Unlike other tools, HTML to Outlook focuses solely on managing HTML email integration with Outlook. Therefore, it is perfect for those who need targeted functionality without the clutter of unnecessary features.
Marketers who need to design and send professional high-quality HTML emails.
Designers to load email designs into Outlook without formatting issues.
Developers looking for a way to test HTML email templates in Outlook.
Professionals who rely on branded email communication and need a dependable solution.
Anyone Using Outlook for HTML Emails – Simplify your workflow and save time.
No need for complex email marketing tools — this lightweight HTML email tool for Outlook gives you exactly what you need, without the extra hassle. It serves anyone who struggles with manual HTML email creation and wants a quick, reliable alternative.
Download HTML to Outlook Today!
Stop struggling with complex email tools. Instead, download HTML to Outlook now to streamline your email creation process.
Optimize your workflow, maintain formatting, and send emails with confidence!
Yes! HTML to Outlook supports any properly formatted HTML code and ensures it is displayed correctly in Outlook emails.
Does this tool allow full email customization?
Yes, you can insert and modify HTML email content before sending it through Outlook. Note, however, that this tool is not intended to replace your WYSIWYG editor. It provides a simple text editor to modify the HTML code if necessary.
How does the command-line execution work?
Simply run the program with an HTML file path and the /e key to open the email automatically: HtmlToOutlook.exe “C:\path\to\email.html” /e
This will load HTML into Outlook and open a new email without manual interaction.
Do I need Microsoft Outlook installed?
Yes, HTML to Outlook requires a functioning installation of Microsoft Outlook 2019, 2021, or Office 365.
Is it easy to automate?
Absolutely. By using command-line execution, you can load HTML files and create emails with minimal effort.
If you need a simple, effective way to handle HTML emails in Outlook, HTML to Outlook is the solution you’ve been waiting for!
The following sequence will help you insert HTML into Outlook 2016 and other versions. With a template, the process is quick and straightforward.
Open MS Outlook and go to the “Home” tab.
Click on “New Email” to create a new email message or use a Ctrl+N shortcut.
In the new email window, click on the “Insert” tab.
Within the “Insert” tab, click on “Attach File” or “Attach Item” (depending on your version of Outlook).
Locate and select the HTML file you want to insert into the email. Click “Insert” to attach the file.
Once the HTML file is attached, it will appear as an attachment at the bottom of the email.
Right-click on the attached HTML file and select “Save As” to save the file to a location on your computer.
Open the saved HTML file in a text editor or HTML editor.
Customize the HTML template according to your needs, adding images, text, and formatting as desired.
Once the HTML template is ready, select and copy all the HTML code.
Go back to the email message in Outlook and click on the “Insert” tab.
Within the “Insert” tab, click on “Signature” and then select “Signatures” from the drop-down menu.
In the “Signatures and Stationery” window, click on the “New” button to create a new email signature.
Give the new signature a name, and then paste the copied HTML code into the “Edit signature” box.
Click “OK” to save the new signature.
Close the “Signatures and Stationery” window.
To use the HTML template in a new email, click on the “New Email” button, and your signature with the HTML template will be automatically inserted into the message.
You can further customize the email if needed, add recipients, and send the email as usual.
Note: The steps provided might vary slightly depending on the version of MS Outlook you are using.
The attachment option may also be added to your Quick Access Toolbar. To do this, access options through “File“. You will see “Quick Access Toolbar” on the list on the left. Choose “Attach File“. This allows you to embed HTML in Outlook quickly.
Important Tips for HTML in Outlook
So, how can you make sure your message is not distorted? Here are a few tips from experts. These will prevent the most common problems like broken links and formatting disasters. Create HTML email in Outlook with these factors in mind.
1. Use Alt Text for Every Image
The mail client may block images. A possible solution is the addition of alt text. This is a simple word or phrase describing the image. If it is missing, the recipient can still read the description in the box and unblock it.
One major downside is that MS Outlook recognizes a limited range of fonts. Anything unfamiliar is automatically converted to Times New Roman, which may look awful. To be safe, use standard options like Courier, Arial, Veranda, or Georgia.
But what is your font that is part of the brand image? In this case, force the system to use an acceptable standard font instead of Times New Roman. This will serve as your fallback.
3. Tables Are Handy
This format helps to structure your message template. You can easily split content, choose backgrounds, style text, etc. Use tables to ensure all recipients see the same rendition regardless of their mail system. Remember to add align=”left” to make the message responsive. This way, boxes will be displayed conveniently on both wide and small screens. In the first case, they will be aligned next to one another. In the second case, they will be placed on top of each other.
4. Not Too Wide!
A rule of thumb is to stick to 550-600 pixels. This is because wider emails may be displayed incorrectly. Keep your messages narrow, so they can be viewed on any screen. There will still be enough space for an eye-catching design.
Testing is Crucial
Knowing how to send HTML email in Outlook is important. Do not forget to test your work before sending it. Check how it looks on every platform. This stage is worth your time, as it guarantees the right look.
Gordon Lex is a highly experienced software engineer with over 20 years of expertise in the technology industry. Since February 2009, he has been serving as a Senior Software Engineer at GlexSoft, where he leads the development of innovative software solutions. A recognized expert in his field, Lex holds prestigious certifications such as Microsoft Office Specialist Master and Certified Delphi Master Developer. Lex is dedicated to advancing software innovation and delivering excellence in every project.
Today software developed by Lex Gordon helps million of people around the World to migrate between different email applications.
Migrating emails from Outlook to Thunderbird can seem like a daunting task, but with the right tools and guidance, it can be a smooth process. Let's get together and walk…
EML to Thunderbird conversion can feel overwhelming, but Mozilla Thunderbird makes this process more manageable. As a free, open-source email client compatible with both Windows and Mac OS, Thunderbird offers…
Are you trying to convert EML files into Thunderbird folders without losing your email structure, attachments, or formatting? If so, you’re not alone. Many people face the same challenge when…
With the increasing popularity of messengers, emojis are now widely used to add emotional tint in the exchange of messages. They have even found their place in email communication, both…
Introduction Managing and exporting emails efficiently is crucial for businesses, technical professionals, and users handling large volumes of Outlook data. Data Extraction Kit for Outlook offers a powerful solution for…
How useful was this post?
Click on a star to rate it!
Average rating 2.9 / 5. Vote count: 50
No votes so far! Be the first to rate this post.
As you found this post useful...
Follow us on social media!
We are sorry that this post was not useful for you!
Thanks, Alex,
I found some email content format got something wrong, such as font type is not correctly, but I don’t know what happen to it? For example, I found it’s original code by email, when I remove some tag, the font will change normal. But I don’t know why suddenly added these tags?
Each case must be studied locally. Without having data by the hand, it is almost impossible to understand what exactly is going on in a particular case. It is better to contact the manufacturer of the email client so that they can diagnose and identify the problem. All I may do, it is suggest what may be wrong there. Here are few reasons why the email content in Outlook is formatted incorrectly:
Copying and Pasting: If you copied the content from another source (such as a website or another email), it may carry over the formatting and HTML tags associated with it. When pasting into Outlook, these tags can cause the font to appear incorrectly.
Forwarding or Replying: When forwarding or replying to an email, the original formatting and HTML tags may be retained. This can lead to inconsistencies in the font type and formatting if there are conflicts with the default settings in Outlook.
Email Templates or Signatures: If you are using email templates or signatures that contain specific HTML tags or formatting, they can affect the appearance of the email content. These tags might be added to maintain consistency or branding but can cause font changes if not properly handled.
To troubleshoot and address the issue, you can try the following steps:
Clear Formatting: If you notice incorrect font types, you can select the text and use the “Clear Formatting” option in Outlook to remove any unwanted HTML tags or formatting.
Paste Special: Instead of directly copying and pasting, use the “Paste Special” option in Outlook. This allows you to paste content without carrying over the formatting from the original source.
Plain Text Mode: Use the “Plain Text” mode in Outlook. This will remove all formatting, including HTML tags, and display the email content with a default font. However, keep in mind that this will also remove any formatting you may want to retain.
Review Templates and Signatures: If you have customized email templates or signatures, review them to ensure they do not contain any unwanted formatting or HTML tags that might affect the font appearance.
By taking these steps, you should be able to identify and rectify any formatting issues that may be causing the incorrect font type in your Outlook emails.
There could be a few reasons why the font size changes from 12 to 10 after sending an email in Outlook. Here are a few possibilities:
Outlook settings: The recipient’s email client or webmail service may have default settings that display the email content in a different font size. This is beyond the sender’s control, and the recipient’s email client will determine how the email appears.
HTML formatting: If the email was composed using HTML formatting, the recipient’s email client may interpret the HTML code differently and display the content in a different font size. This can happen if the recipient’s email client doesn’t support certain HTML tags or styles used in the email.
Plain text conversion: If the email is sent as plain text, the recipient’s email client may convert the email to its default font size, which could be different from what the sender originally set. Plain text emails don’t support font size specifications, so the recipient’s email client will determine the font size.
It’s important to note that once an email is sent, the sender has no control over how the recipient’s email client displays the content. Different email clients and devices may interpret the email formatting differently, leading to variations in font size, formatting, or appearance.
Our company currently offers tools for Thunderbird, Mac Mail, Entourage, Eudora and many other email apps, as well as formats like MBOX, EML and MSG. We make sure that all of its products are timely updated after the release of new Outlook versions, including 32- and 64-bit editions, and guarantees the absence of any ad- or spyware in installation files...


Thanks, Alex,
I found some email content format got something wrong, such as font type is not correctly, but I don’t know what happen to it? For example, I found it’s original code by email, when I remove some tag, the font will change normal. But I don’t know why suddenly added these tags?