Live Mail to Outlook Transfer – User’s Manual

To import Windows Live Mail to Outlook you need to follow the simple instructions provided below. Ideally, you need both mail systems installed on the same machine. However, you can use the pst converter without Windows Live Mail to perform the email conversion on another computer. The method works for Microsoft Outlook 2019, 2016, 2013, 2010, and older.
Content of this instruction:
Method 1: Convert Windows Live Mail to Outlook using our software
Extra Tips
Method 2: Export Using Windows Live Mail Client
Method 3: Export Windows Live Mail via IMAP
Method 1: Export with Live Mail to Outlook Software
The Windows Live Mail to Outlook Transfer tool automates email conversion, ensuring a smooth, error-free migration. Save your emails, folders, and attachments in PST format or transfer them directly to Outlook.
The Windows Live Mail Live Mail to Outlook conversion tool ensures a seamless and efficient process to transfer Windows Live Mail to Outlook. The software has been designed with a user-friendly interface, making the process to export Windows Live Mail to Microsoft Outlook straightforward even for non-technical users. Once converted, the emails are saved in PST format, ready to be imported into Microsoft Outlook file format.
In conclusion, the Live Mail to Outlook Converter utility is a reliable solution for anyone who wants to import Windows Live Mail to Outlook. The process of import Live Mail to Outlook is simplified, saving the eml files in PST format, makes it easier to export Windows Mail data to Outlook application or PST format.
Live Mail does not come as part of the operating system since Windows 10. New operating systems (Win 10 and higher) contain the Microsoft Store Mail application (Mail App) pre-installed. If you copied your Live Mail files from an old computer, or if you’re still using an older version of the operating system, you can follow these instructions to export Windows Live Mail to Outlook. The following semi-automatic method makes the migration task extremely easy.
Step-by-Step Email Migration Process
- Download and Install the Software
- Install the Live Mail to Outlook Transfer tool to your Windows PC. Choose the 32-bit or 64-bit version depending on your Outlook installation.
- Locate Live Mail Data
- The tool automatically detects the source directory. Alternatively, browse to find your emails.
- Scan for Subfolders
- Use the “Scan Folder” feature to identify email folders and messages for conversion.
- Save to PST File
- Activate “Save to PST” mode to generate a standalone PST file that’s compatible with Outlook.
- Import PST to Outlook
- Use Outlook’s “File > Open & Export > Open Outlook Data File” option to access your imported messages seamlessly.

With the Windows Live Mail emails conversion tool, we did our best to automate as many operations as possible, and we’ve got 99% of the process covered by the tool. All you need to do is make a couple of simple choices and confirm your selections. You have two options: direct transfer to Outlook application or saving messages to a new PST data file.
The first scenario is fairly self-explanatory, while the second one allows you to copy the resulting file to any type of drive or cloud storage or transfer it to another system. Imagine that you have Windows Live Mail and Outlook 2019, 2016, or an earlier version installed on the same system.
Export Windows Live Mail Emails to PST file on Your Hard Drive
Windows Live Mail to Outlook PST Converter can export emails to Outlook email client and also save them to a PST data file on your HDD. The EML to PST conversion mode is active by default and we recommend using this mode because it is the most stable and independent of other settings that can affect the result.
In addition, creating a separate PST file of the PST file format avoids mixing existing email messages with newly imported ones. This method requires a standalone version of Outlook to be installed on the computer where you run the conversion.
If Windows Live Mail is not installed on the same computer, you can still use Live Mail Transfer utility. Just copy the Windows Live Mail data folder from any other system and convert its contents into a Outlook Data File. Copy the PST data file to the destination system and load it in Outlook to access the converted emails. To convert Live Mail eml file to pst format follow these simple steps:
Step 1: Download and Install Windows Live Mail Converter
Download and install the latest version of Live Mail converter software on your PC. Installation is fast and easy, and does not require any additional tools to be downloaded. Both 32-bit and 64-bit programs will be installed at once.
Step 2: Run Windows Live Mail to Outlook converter utility.
Use appropriate shortcut to run the tool that supports the similar bitness that Outlook have. If your Outlook version is 32-bit you have to run 32-bit version of the Windows Live Mail to Outlook converter tool. For 64-bit Outlook you have to run 64-bit version of the Live Mail Transfer utility. Both shortcuts are created during Setup.
![]()
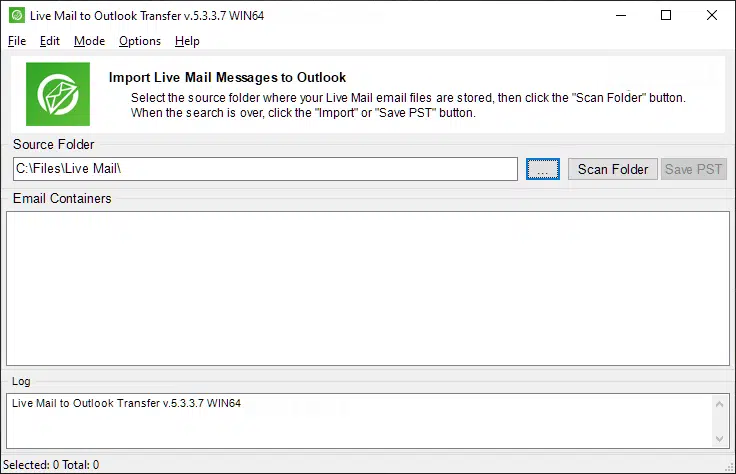
Step 3: Specify location of Source Live Mail folder
The Windows Live mail to Outlook conversion program should automatically detect the location of the source directory containing Windows Live Mail eml files and subfolders. If it doesn’t happen for some reason, click on “…” (Browse) and navigate to the necessary folder on the hard drive (see “Source folder selection” for details). You can also use the File > Open command to select the source folder containing Windows Live Mail emails.
The Browse option is also available via the File menu.
Step 4: Scan the Subfolders for EML files
Click the “Scan folder” button to find all Windows Live Mail email messages (eml files) located in the specified source folder and its subfolders. Folder structure will be converted into Outlook folders.

The program will show a list of available folders and files of eml format in the “Email Containers” panel.

Step 5: Enable “Save to PST” mode
Ensure that “Save to PST file” mode is active in the Windows Live Mail to Outlook conversion program menu “Mode”. Saving to PST file format is active by default. If another mode is active but you want to save data to a PST data file on your hard drive, use the Mode > Save to PST file command to switch modes.
Step 6: Start the conversion
Click the “Save PST” button. The program will prompt to select the directory to save a new PST data file and specify the PST file name. Default File Name will be offered.

Chose a folder on your computer to save PST file and click “Save” button. You may select the existing PST file here to append existing file of PST file format.

Step 7: Open PST file
By default the program trying to load resulting PST data file to Microsoft Outlook immediately after Windows mail conversion. This requires the program option “Open PST file in Outlook (when finished)” to be enabled. Alternatively you may open the PST file manually, for that click open Outlook, and use menu File > Open & Export > Open Outlook Data File:

In Outlook, locate the title (the default title is “Live Mail to Outlook Transfer”) of your .pst file in the list of Outlook folders, and expand the folder tree by clicking the rectangle icon to the left of the folder name.
Note: Windows Live Mail stores the long folder names truncated to 8-11 characters followed by a space and three random alphanumeric characters. The correct representation of the folder names is stored in an encrypted database that is not accessible for security reasons. Because our software takes the folder structure from the file system, the long folder names may appear truncated and you may need to manually rename some folders in Outlook to restore their original names. However, it is the minimum manual work that may be required for importing emails from Windows Live Mail into Outlook.
As you can see, moving your live mail email messages from eml files and attachments from one application to another is a breeze with professional third party tool software. It works for Outlook of versions 2019, 2016, 2010 and earlier releases. Should you, however, have any problems converting your emails using this product, please do not hesitate to contact our support with a description of your problem, and we will do our best to get back to you as soon as possible.
Import emails and attachments from Live Mail to MS Outlook Directly
This method requires you to have standalone Outlook installed on your system. Outlook User Profile should be configured, for that you have to run the Outlook after setup and follow the configuration wizard. Here is what you need to do to import Windows Live Mail email messages to Outlook:
Step 1: Download Live Mail converter software
Download and install the latest version of Windows Live Mail to Outlook Transfer on your PC. Installation is fast and easy, and does not require any additional tools to be downloaded.
Step 2: Run Live Mail Transfer software
Since Live Mail Transfer tool works in couple with Microsoft Outlook the architecture of both should match. You have to use the 32-bit shortcut if your Outlook version is 32-bit and 64-bit shortcut if your Outlook version is 64-bit.
![]()
Step 3: Specify source folder containing Live Mail messages
The program should automatically detect the location of the source directory where Live Mail stores eml files. If it doesn’t happen for some reason, click on “…” (Browse) and navigate to the Live Mail storage folder on the hard drive (see “Source folder selection” for details). You can also use the File > Open menu.

Once you have selected a folder and its name has appeared in the Source Folder field.
Step 4: Scan the source folder for Subfolders
Click on “Scan Folder” button or use the File > Scan Folder menu to start searching for subfolders and *.eml files in the specified folder.

The names of available Live Mail eml files will be shown in the large pane occupying the central part of the program window.

Step 5: Select the proper Mode
Use menu “Mode” to enable the option which imports eml files into Outlook email client.
Step 6: Click Import button
Click “Import” button to start importing of your eml files. A new dialog will pop up and prompt you for the destination Outlook folder that your imported email messages will be saved to. Choose topmost folder called “Live Mail to Outlook Transfer” if you want to import eml files according to their folders structure.
For those who are not familiar with Outlook we recommend to select Inbox folder as a target. After conversion you will be able to organize your folders in Outlook.

Click “Done” to start the eml file conversion. Full details about processed items are shown in the log window.
Once the Windows Live Mail to Outlook process is over, you can open Outlook desktop client to access your email messages.
* Free Trial converts limited number of messagesMethod 2: Export Using Windows Live Mail Client
Here is the most obvious way to migrate from Windows Live Mail to Outlook – you simply use Windows Live Mail for that. Even though Windows Mail is now discontinued and is not supplied with the Windows operating system since 2012, you still can use it to move your emails to Outlook.
The method is based on the built-in capability of the Windows Mail client to export Windows Live Mail data to Microsoft Exchange. Consequentially, Exchange can be used to further export messages to Microsoft Outlook. Here is how it works.
Step 1: Initiate export to Microsoft Exchange
Run Live Mail. Then, click “File > Export email > Email messages” as shown below:

This will open the exporting dialog:

Select “Microsoft Exchange” here as a destination format, then click “Next”. Confirm the operation.
Step 2: Select Windows Live Mail folders you want to export
Now, select the folders in your mailbox account that you want to move from Windows Live Mail to Outlook.

Click “Next” button to confirm the selection. You can also export all folders.
Step 3: Select the Outlook account to import data to
Choose the Outlook profile you want your Windows Live Mail files to import to. Click OK. This will export Windows Live Mail to Outlook. Note that the process can take some time. And of course, the PC you run this exporting method at must have Microsoft Exchange services installed.
Conclusion
The above method’s advantage is simplicity. If you have been using Windows Live Mail anyway, it seems wise to use its capabilities to export Windows Live Mail to Outlook. However, since Windows Live Mail support is discontinued now, there might be problems exporting data from it to Outlook.
When exporting Windows Live Mail to Outlook, you may encounter common problems such as error messages like “Something went wrong with error code NNNN” or the export process getting stuck in the middle. While manually breaking your emails into smaller chunks and exporting them one at a time may provide a temporary solution, it can be a tedious and time-consuming process. After all, avoiding manual export was probably your goal in the first place, right?
Method 3: Export Windows Live Mail to Outlook on Another Computer Using IMAP
One option to mail export Windows Live Mail to Outlook is to use the IMAP protocol. The idea behind this method is to export mail from your Windows Mail account to an IMAP mailbox, and then import these data to Outlook.
Here is how to export Windows Live Mail to Outlook 2007, 2010, 2013, 2016 and 2019 using IMAP.
Note: you will need a Gmail mailbox to use this exporting method.
Step 1: Enable IMAP access in Gmail
This method involves fetching data from Live Mail by Gmail mailbox, and then exporting them forward to Outlook. Before we start exporting, enable IMAP in Gmail if it is not yet enabled.
Open Gmail Settings, switch to Forwarding and POP/IMAP tab and enable IMAP as shown below:

Step 2: Add Gmail mailbox to Windows Live Mail
You will need to add a new account to Windows Live Mail.
-
- Run Windows Live Mail.
- Open the Accounts menu.
- Click the “Email” button on the toolbar to configure a new email account.
- Specify your Gmail IMAP account settings: email, password and the server address.
- Select the “IMAP” option in the server type dropdown.
- Finish the new account Wizard.
This will add a new account to your Windows Live Mail application, and this IMAP account is now linked to Gmail mailbox.
Step 3: Move Live Mail messages to your new IMAP account
Now you need to copy email messages and/or folders from your existing Windows Live Mail account to the newly created IMAP account.
Select all emails in the account by pressing Ctrl+A, or select multiple messages using Shift and Ctrl keys. Then, drag-n-drop emails to the new IMAP account.
After that your Gmail account should automatically fetch new emails via IMAP, so you will be able to see the imported email messages there.
Step 4: Login to Outlook with your IMAP settings
After you start Microsoft Outlook application as normal, login to your IMAP account using the same settings that you used before. This will connect your Gmail IMAP account containing emails imported from Windows Live Mail.
Outlook will automatically synchronize the IMAP account and will download email messages.
Step 5: Finish Live Mail to Outlook transfer
As soon as Outlook finishes synchronization, your Windows Live Mail emails are ready to be moved elsewhere. So, you can copy them to another Outlook account or export Windows Live Mail to PST. After you copy the imported Windows Mail emails to another account, you can remove the intermediate IMAP account you used to transfer the data.
Method 4: Converting EML files via Outlook Express
- Open Windows Live Mail and select the messages you want to export. Click on “File” then “Export” and choose “Microsoft Exchange” as the format.
- A dialog box will appear asking you to confirm the destination. Choose “Microsoft Outlook” and click “Next”.
- Select the folders you want to export or choose “All folders” to export everything. Click “Finish” to start the export process.
- Once the export is complete, close Windows Live Mail and open Outlook Express.
- In Outlook Express, click on “File” menu, then “Import” and choose “Messages”.
- In the import dialog box, choose “Microsoft Live Mail” and click “Next”.
- Browse to the location where you exported the Live Mail messages and select them. Click “Next” to start the import process.
- Once the import is complete, you can close Outlook Express and open Outlook.
- In Microsoft Outlook, click on “File”, then “Open & Export” and choose “Import/Export”.
- In the import/export wizard, choose “Import from another program or file” and click “Next”.
- Choose “Outlook Express” and browse to the location where you imported the Windows Live Mail messages in Outlook Express. Click “Next” to start the import process.
- Once the import is complete, your Live Mail messages should now be in Microsoft Outlook.
- Open Outlook and check the result of conversion.
Remark: Please note that Outlook Express is an outdated email client that was discontinued by Microsoft. Therefore, this method will not work for many Live Mail users who are using newer versions of Windows. It is recommended to use more current methods or tools for migrating emails from Live Mail to Microsoft Outlook and running the Live Mail to PST conversion.
Conclusion
As you see, this method involves using a third-party IMAP server. In this example of importing emails to Outlook we used Gmail, but in fact you can use any other IMAP server too. While this method typically works ok, it still involves a lot of manual operations. It is also not ideal in terms of the final result. Some users report missing emails after conversion finishes. Sometimes email format gets damaged too.
Overall, if you need to migrate emails Windows Live Mail to Outlook email client, convert Live mail to PST or export EML files manually to another or the same computer, this is a viable option to try. We recommend start by ensuring that your Outlook installation is complete and up-to-date. For that you may open Outlook on your computer and check the version you have. Update it if Outlook version is outdated.
Extra Tip 1: Import Contacts from Windows Live Mail to Microsoft Outlook
To move Live Mail Contacts into the new system, you need to export it from Live Mail in the CSV format (Comma Separated Values file). This is a piece of cake thanks to the direct export feature. To move CSV contacts into Outlook in a manual way, do the following:
- Click on Contacts at the bottom of the interface.
- Click on the Export button at the top.
- Choose CSV to export the contacts into a single file.
- Use the wizard for importing and exporting data. It is summoned differently depending on the version:
- 2007 and older — go to the File menu
- 2010 and 2013 — from File, go to Open
- 2016 and 2019 — from File, go to Open & Export
- Choose Import from another program or file and click Next.
- Choose the CSV format and click Next.
- Browse to where the previously exported *.csv file is stored and click Next.
- Specify that the Contacts folder is the destination and proceed further.
- Click Finish.
- Open Outlook, go to Contacts folder and check imported Live Mail contacts.
If you only need to convert a few eml files or contacts to pst files, using manual methods can be good. However, the huge conversion process can only be done with the help of the PST conversion tool.
Read detailed Live Mail contacts conversion instruction.
Extra Tip 2: Export Calendar Windows Live Mail to Migrate to Outlook
To export your calendar from Windows Live Mail for migration to Outlook, follow these steps:
- Launch Windows Live Mail on your computer.
- Click on the “Calendar” tab or navigate to the calendar section of Windows Live Mail.
- In the Calendar view, locate the option to export the calendar. This may be under the “File” or “Options” menu.
- Select the appropriate export format for your calendar. Common formats include iCalendar (.ics) or CSV (Comma Separated Values).
- Choose a destination folder on your computer where you want to save the exported calendar file. Remember the location for later use.
- Initiate the export process, and the calendar data will be saved to the specified location in the chosen format.
- Open Outlook on your computer.
- In Outlook, navigate to the Calendar section or select the import option.
- Choose the option to import from an external file or another program.
- Browse your computer to locate the exported calendar file saved in Step 5.
- Follow the on-screen prompts to complete the import process and bring your Windows Live Mail calendar into Outlook.
By following these steps, you can successfully export your calendar from Windows Live Mail and migrate it to Outlook, ensuring a seamless transition of your important calendar data.
Note for old system users: Unfortunately, the old system cannot sync its calendar data with Outlook. There are no export options, either. All you can do is save the items by forwarding them to the new email address. Import within the Calendar folder is impossible.
Extra Tip 3: Finding where Windows Live Mail stores messages
Source folder selection
All of our products automatically detect the location of source Windows Mail folders. The Live Mail to Outlook Transfer utility is no exception – it checks the necessary system records as soon as it starts to find out where Windows Live Mail messages and attachments are stored. This method works with Outlook 2020, 2019, 2016 and earlier versions.
In the majority of cases, the path will be as follows:
C:\Users\USERNAME\AppData\Local\Microsoft\Windows Live Mail\
The program will automatically paste it into the data Source Folder field.
If the program does not detect the path to the Live Mail storage folder automatically, this may indicate a conflict of profiles, identities, a registry error or any other non-critical problem. In this case, click the “…” (Browse) button to open the standard Windows folder selection dialog and select the source folder manually. Please note that the path specified above may be hidden and not available for selection right away.
How to find Windows Live Mail 2012 source data location
Default location of the Windows Mail 2012 storage is:
C:\Users\USERNAME\AppData\Local\Microsoft\Windows Live Mail\Storage Folders\
You may check where Windows Mail Essentials 2012 stores the source files per this sequence:
- Click the File tab, click Options item, click Mail…
- Click Advanced tab, then click Maintenance… button
- Click Store Folder… button
The program will show you the full path to the source folder. The emails are located in the subfolder called Storage Folders. Use them for messages import Windows Live Mail email client to Outlook.
To make it visible in Win 7, do the following:
- Open Windows File Explorer, click on “Organize” and select the “Folder and Search Options” command from the menu.
- Switch to the “View” tab
- In “Advanced settings”, find the “Hidden files and folders” node and expand it
- Enable the “Show hidden files and folders” radio button
- Uncheck the “Hide protected operating system files” option
- Click OK.
To make hidden files visible in Windows 10, do the following:
Ensure that you have Live Mail installed at the system, not the Mail App which goes pre-installed.
- Open File Explorer window
- Select View > Options > Change folder and search options.
- Select the View tab
- In Advanced settings, select Show hidden files, folders, and drives
- Click OK.
Doing this will unhide the previously hidden folders and allow you to select the one containing Live Mail source files in the manual mode.
IMPORTANT: Please note that our products are capable of extracting and converting data from damaged mailbox files of all supported formats.
Frequently Asked Questions
Can I import Windows Live Mail into Outlook?
Yes, of course. In this article above, we explained three working methods to export from Windows Live Mail to Outlook. Some methods require many manual operations, while others are mostly automatic. We recommend trying our Live Mail to Outlook Transfer software, because this tool offer the best balance between cost of conversion process and time spend on it. Using manual methods is not an option.
How do I transfer emails from Windows Live to Outlook 2010?
Even though different versions of Outlook or Microsoft Exchange may not be equally compatible with Windows Live Mail software, you still can easily transfer emails from Live Mail to Outlook, including Outlook 2019 using our migration tool for WLM. Use the above tutorial to import your emails to Outlook.
How do I transfer contacts from Windows Live Mail to Outlook 2019?
Moving contacts from WLM to Outlook 2019 is also possible. Here is a step-by-step instruction on how to import your contacts from Windows Live Mail to Outlook.
How to export Windows Live Mail to Outlook on another computer?
Windows Live mail users often need to export emails and upgrade from your old computer with Windows Live Mail to Outlook on your new computer. In this case, you probably cannot use direct transfer of email data via Microsoft Exchange. Also, direct Windows Live Mail export to Outlook may also not work.
In this case we recommend either export emails from WLM to a third-party IMAP server (i.e. Gmail), and then connect to that IMAP server from your new computer with MS Outlook. Another option is to export mails from Live Mail to a PST file (see below), and then transfer this file to your new computer and load it to Outlook.
How to convert Windows Live Mail to PST?
Windows Live Mail to Outlook converter offers you a simple way to save Windows Live Mail emails as a standalone Outlook Data File too. Please see the instruction above to learn how to convert Windows Live Mail emails to PST with our Windows Live Mail to PST converter tool.
You may also want to know:
- How to export Live Mail contacts to Outlook
- How to open PST file and check the result
- How to transfer emails from Thunderbird to Outlook?
Other Tutorials


I loaded your program, and I cannot get the 64bit program to run. I can run the 32bit program, but I need the 64bit program to run