Outlook AutoArchive is a handy but relatively obscure feature of Windows mail. As the name suggests, its purpose is to store old messages following certain rules. These may be default or customized, based on your needs. Read on to learn the right techniques to adjust Outlook AutoArchive settings.
Microsoft Outlook AutoArchive Settings
So, what happens if you click this button? By default, the feature does not do anything, so do not be afraid to turn it on. Basically, the system immediately begins to sift through your folders and apply the rules it knows. The true value comes to light when you decide to move your outdated emails. It is possible to transfer them to a special location, so they are still accessible, but do not clog your inbox. This is exactly what automatic archiving Outlook 2013 allows you to do. Here is how to customize the system according to your wishes.
How to Setup Archive in Outlook 2013 (And Others)
Let’s begin by activating the feature. Launch your mail client and take the following steps.

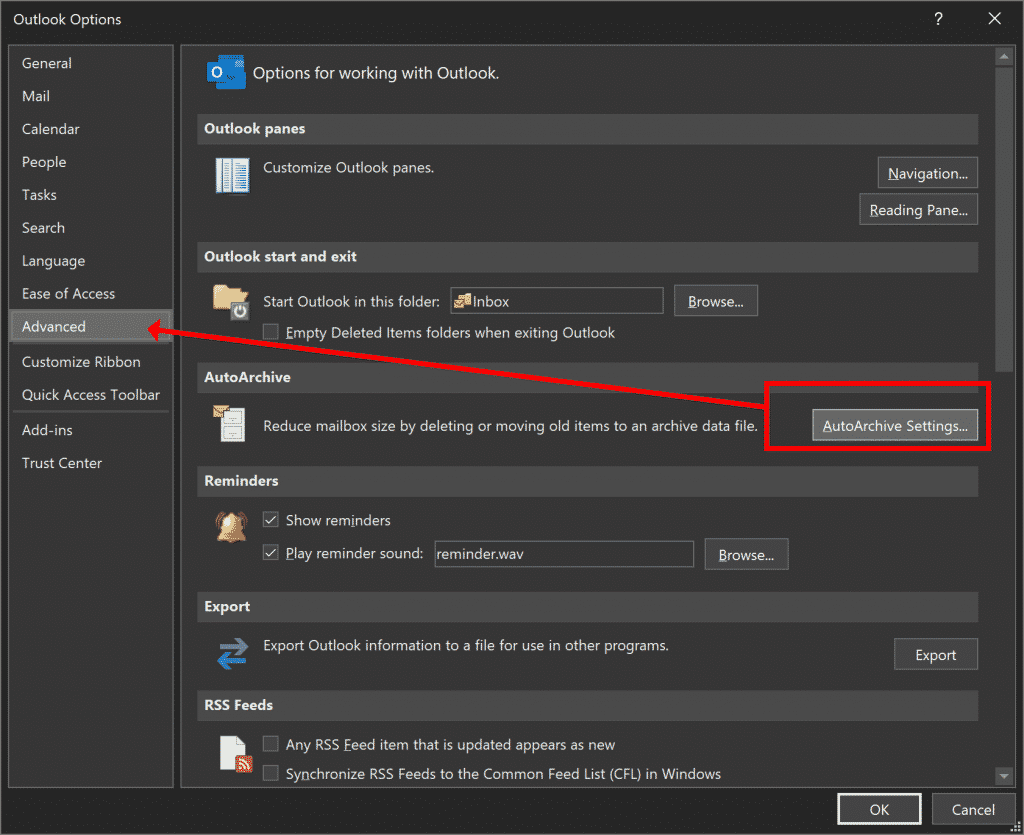
- From the File tab, access Options.
- Head to the Advanced section.
- Choose AutoArchive Settings.
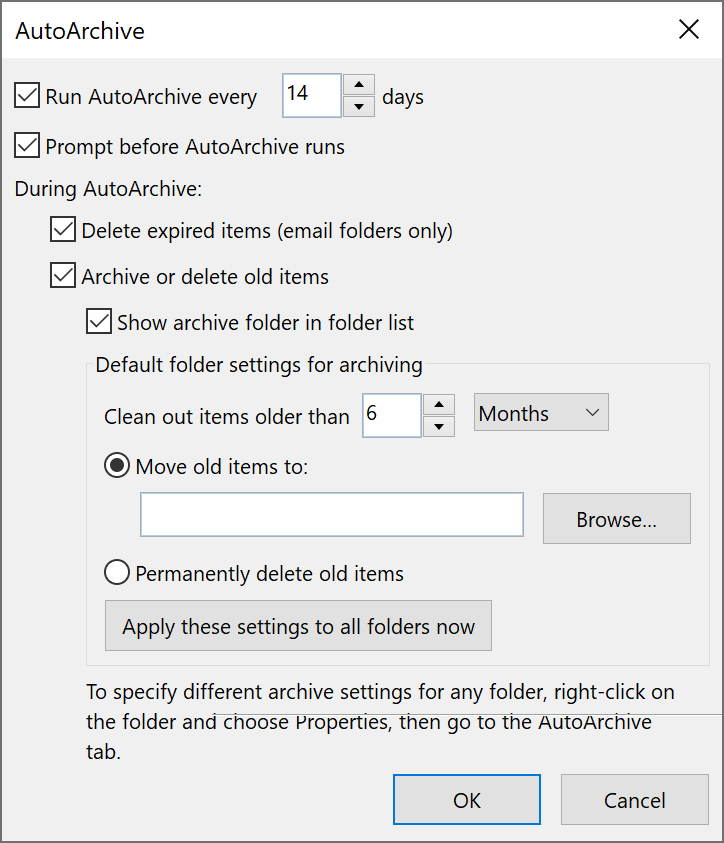
- Enable Run AutoArchive every (with an adjustable number of days).

Now, your feature for automatic archiving is on. It is time to examine its options in practice.
Key Peculiarities
AutoArchive works differently from Conversation Folder Cleanup. If you have ever used the latter, you know it can be used manually. Its settings are applied to any folder you see fit. All settings fit into a single window.

AutoArchive may be active for several folders. Each of them will be scanned and rearranged using the current settings. Lazy users may stick to default settings (if suitable) and have them applied across the board. If they do not meet your needs, it is time to fine-tune the system. Read on to learn how.
Setup AutoArchive Outlook 2010
The frequency of archiving may be changed according to your needs. The default value is 14 days. Users may change the number by using arrow keys or typing the desired figure. The system allows any choice between 1 and 60. It will not let you enter a longer interval.
Now, you may program Outlook to show you a prompt before running the archive function. This is achieved via checking the box before Prompt before AutoArchive runs. The notification will allow you to check the settings, change them, or cancel the operation altogether.

The next group of parameters refers to target item groups. What are you going to archive, and how? Some of these settings are limited to messages. For instance, you may want old emails with expiry dates to disappear. Here, you should choose ‘Delete expired items’. The operation has no effect on your folders with events or tasks.
All other settings apply to all folders. Let’s see what can be done with them. Outlook items include:
- notes,
- calendars,
- events,
- tasks, and
- journal entries.
By default, a special data file with the *.pst extension stores items that have spent over 6 months in your system. The file is named ‘Archive’. Like the frequency of archiving, the file name can be changed. Look at the box for Archive or delete old items. It must be checked for this rearrangement to occur. The archive file will be accessible at any time as you will see it on the navigation pane. As mentioned above, you can specify the desired frequency. It is also possible to set the target group. For instance, you may program the system to archive messages of a certain age — between 1 day and 60 months. This is done via Clean out items older than. It is also possible to assign another data file as a storage destination.
Finally, old items may be deleted permanently. Be careful with this option. Emails that are affected by the rule will leave no trace in your Deleted Items folder. Think twice before applying the rule. While you could theoretically retrieve them from the server, this is not guaranteed. To save the settings and close the window, click OK. Now, auto-archiving Outlook is working. It will function following your settings, including the frequency of archiving. Usually, the feature starts working a few minutes after its configuration is complete.
If your mail client is programmed to display the AutoArchive prompt, expect to see it shortly. Its default operation concerns some folders only. These contain your sent and deleted items, as well as tasks and calendar. The settings may also be adjusted as you like.
Assigning Folders for Auto Archive
It is possible to run the process on any folder. This is achieved by turning the feature on for each of the target locations individually.
- Right-click on each and head to its properties, or
- Use the alternative path is via the ribbon. You can access the same Folder properties from its File section*.
*If you want to set up archiving for the calendar or tasks, this is the only way to reach their properties.
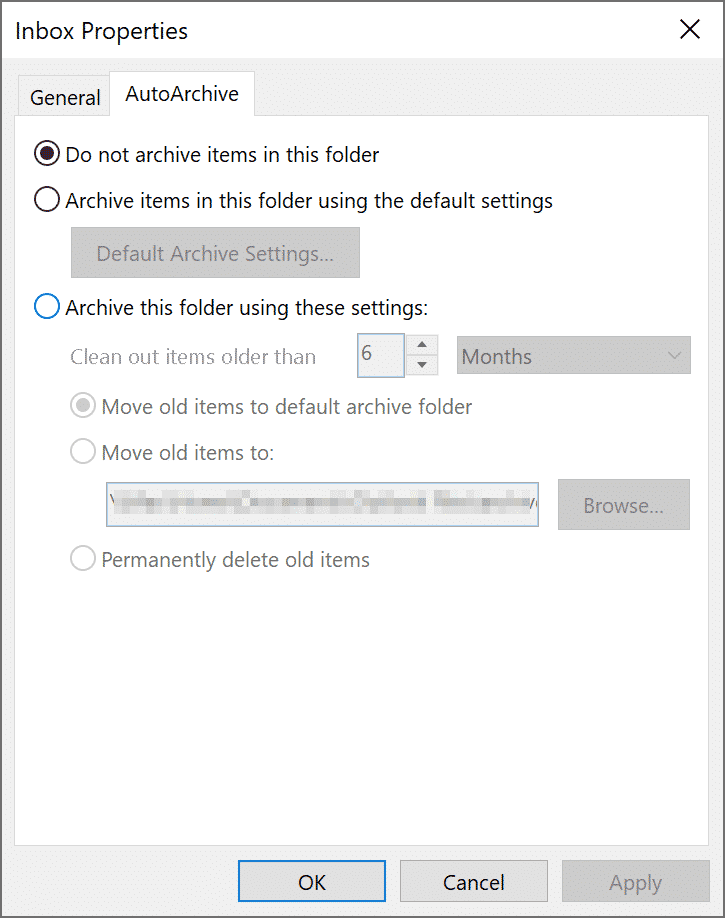
Now, click on the tab for the archiving function. It displays the range of possible settings for the folder. By default, the system does not archive any items, so the corresponding box is checked. This means the feature ignores the items in the location. To include the folder into the list of sources, check the necessary box. It is titled ‘Archive items in this folder using the default settings’.
What if the default settings do not suit you? In this case, you will switch your choice to ‘Archive this folder using these settings’. Now, the parameters may be edited according to your needs.
AutoArchive Settings Outlook 2013 (and for other versions) may always be reversed to defaults. This is done by visiting the AutoArchive Settings (File — Options — Advanced). The option you should click is called ‘Apply these settings to all folders now’. Once it is on, all folders will have settings reverted to the default ones.
Key Takeaway
Automatic archiving is a handy feature of the Microsoft mail environment. When used properly, the tool keeps your inbox tidy and allows easy access to older messages. Users may adjust the frequency and other parameters of its work with ease.
A clogged mailbox is an obstacle to efficient business communication. The more emails you receive — the harder it is to find the necessary message. Thanks to AutoArchive, users do not need to worry about the flooding of their systems. Allow the process to run in the background, and enjoy smooth mailing experience.


