When it comes to mail clients, many businesses and users prefer Outlook due to its security, versatility and power. It allows users to store and manage large volumes of correspondence and access multiple accounts on a single server. However, there are also some disadvantages, including the fact that some users find it frustrating to export emails from MS Outlook.
While there are different manual methods available, none of them is perfect. One potential solution is to copy and paste individual emails into a word processing program, although this may not always preserve the original formatting.

In this article, we will provide a number of reliable methods for converting emails into Microsoft Excel spreadsheets. Unfortunately, there is no automated way to export emails from Outlook to Excel. The process can be complex unless you are familiar with a few tricks, which we will explain below.
Benefits of Exporting Outlook Emails
There are a number of reasons why users may want to export their Outlook emails to Microsoft Excel. The most common motivations for doing so are:
- the need to transition to a new server
- the need to create a distribution list for other applications
- the need to switch between platforms
- the need to share information with another user
- the need for a backup.
When moving from system to system, data often gets damaged or lost. The process of transferring data to Excel can be challenging, and there is a risk of losing information if the method is not correct. Instead of taking risks, we recommend utilising the methods outlined below, which involve copying and pasting data or exporting to a CSV file.
Advantages of importing to spreadsheets are numerous
Exporting to Microsoft Excel is one of the most reliable transfer modes. The spreadsheet format allows you to arrange conversations into a database, enabling you to find old contacts and exchanges by different parameters like date of context.
A spreadsheet as a backup option is also worth considering. Any valuable information from Outlook should be copied for recall, as you may need to find particular conversations for personal or legal purposes at some point. In the event of server failure, the XLS file provides a backup solution, mitigating the risk of data loss.
How to Export Outlook Emails to Excel
Let us review the process of exporting Outlook messages to an Excel worksheet, as well as how to create a distribution list from Outlook email addresses or contacts. You may also find the following steps useful when creating an email forensic reports. Please click the button below to download the Outlook Data Export Kit software, and then install and run it.
* - The unregistered version converts a limited number of messagesTo export Outlook messages to excel:
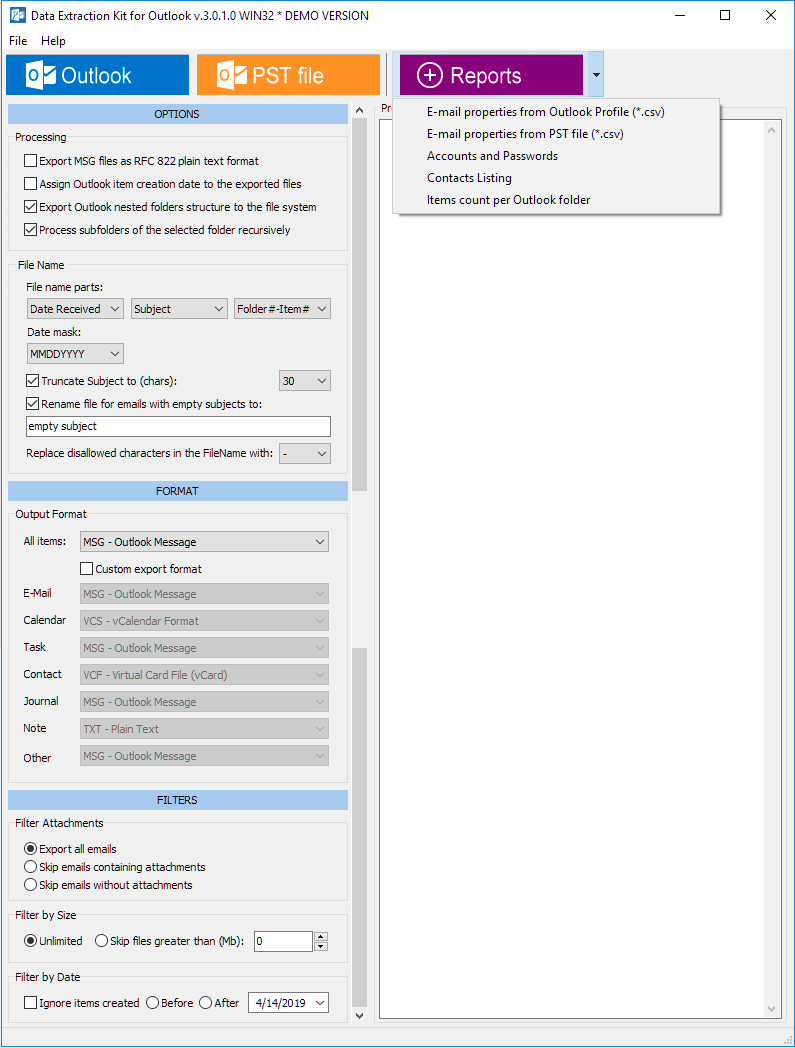
- Click on the ‘Reports’ button, which you can find in the topmost menu.
- Select the ‘Email properties…’ option.
- Pick your report options and run the report.
To generate a distribution list:
- Click “Reports” button and choose “Contacts listing” or “List of recipient email addresses” if you want to generate a distribution list,
- Choose the report options and execute the report.
- Open result file in Microsoft Excel or another spreadsheets editor.
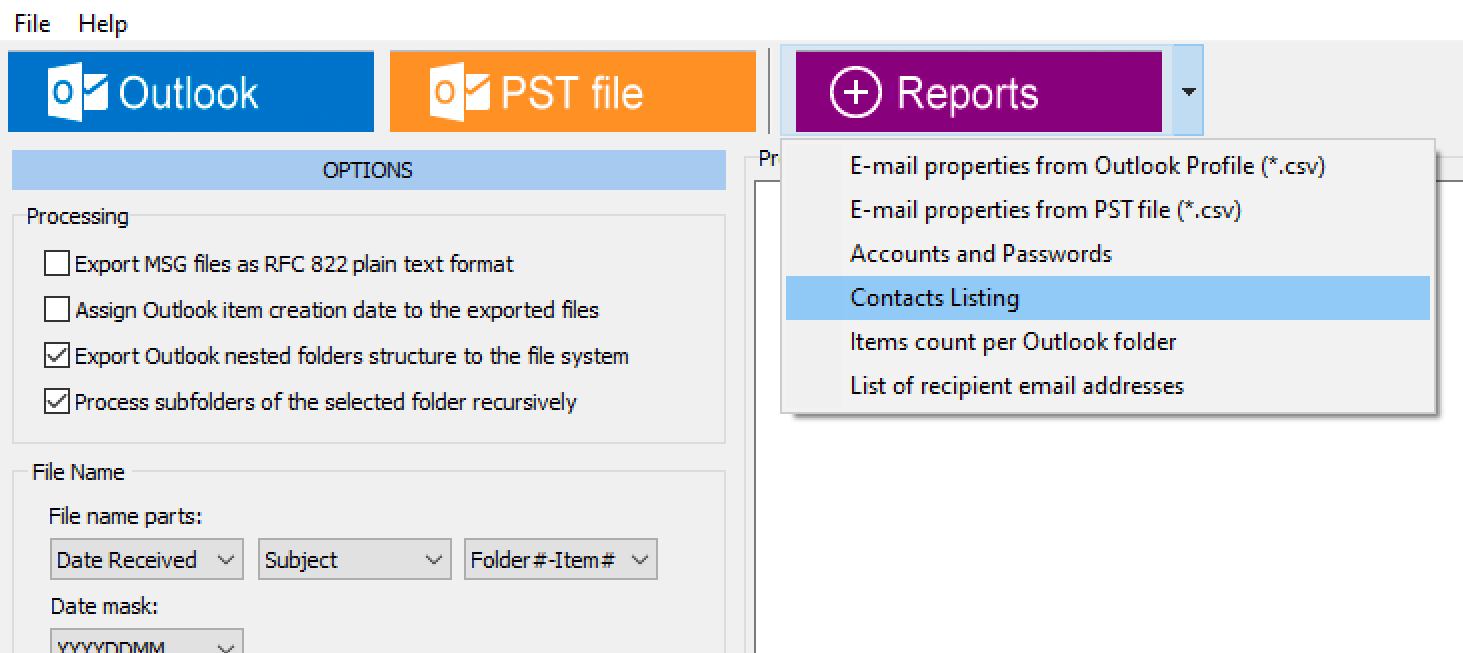
In addition, the Data Extraction Kit for Outlook enables the creation of a list of Outlook accounts and passwords. We invite you to explore this feature.
Additionally you may want to know how to Import Email Addresses From Excel to Microsoft Outlook.
Export each email from an Outlook mail folder to a standalone Excel/CSV file
If you need to export emails from Outlook to Excel, you can do so manually by opening each email and creating a corresponding Excel file. This method does not require any special software. However, it should be noted that Outlook’s import/export feature does not allow for the creation of individual Excel files. When you export, it creates one Excel file containing all the emails.
If you need to export emails in a more organized way, you may find a third-party tool that can batch export each email into a separate workbook useful. These tools generally include a “bulk save” feature. Our Data Extraction Kit for Outlook doesn’t have this feature, but you can set up custom filters that allow you to generate specific file categories, such as “Emails with attachments” or “Emails without attachments”. You can also use the date range feature to get individual files for each day, week, month, etc. Forensic reports can also be generated using features such as “Items count per Outlook folder”.
How to export Outlook emails to Excel
- Download, install and run the DEKit software.
- Click the “Reports” button in the top panel.
- Select “Email properties from Outlook profile” report.
(Alternatively, you can use a second report that uses the Outlook PST file instead). - Specify the location and name of the Excel file to which you want to export Outlook e-mail properties.
- Click the “Save” button.
- Select the Outlook profile you want to use if the program prompts you to do so.
- In the next dialog select the Outlook folder you want to work with.
Note that the program will also process all subsequent folders if the corresponding option is enabled. - Click the “Done” button. The program will create a report.
- Open the created report file in Excel to view its contents.
How to Export Emails to Microsoft Excel using Outlook
Please note that while this process is relatively straightforward, there are a few important considerations to keep in mind. Firstly, it is essential to understand that the data will be transferred as plain text, including contacts and basic links. There are no exceptions to this rule, regardless of whether you are using a Windows or Mac device. If preserving the original email’s appearance is a priority, we recommend saving it as HTML. Otherwise, please follow the outlined procedure:
- Open the Microsoft Outlook app.
- Head to the File menu.
- Choose the feature for opening and export.
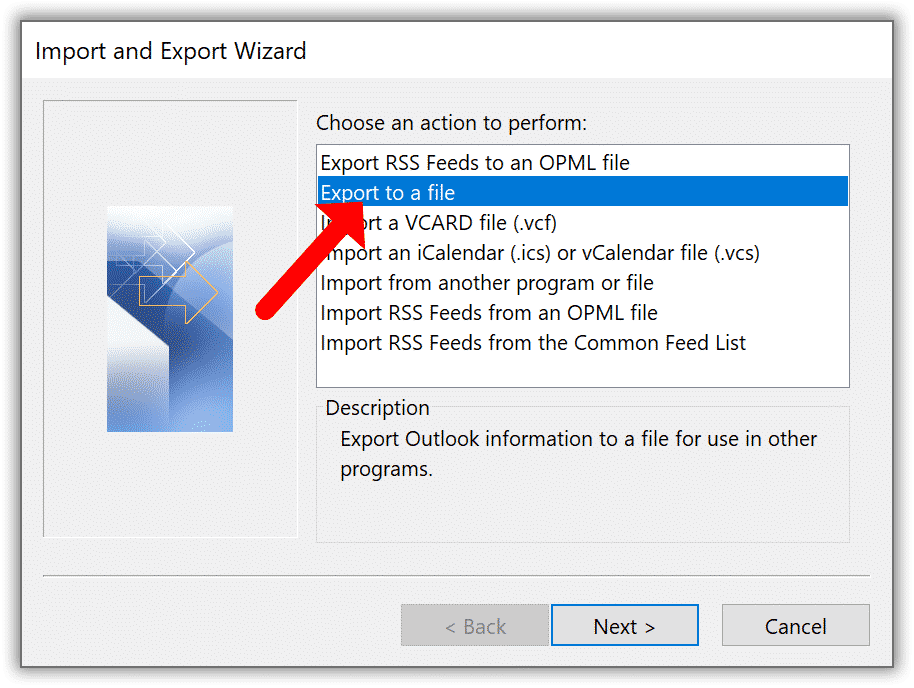
- Select “Import/Export” to find “Export to a File”.
- Specify that you need to create a file for Excel (CSV), not a PST file.
- Choose from the available folders where the file can be saved.
- Place a tick next to the “E-Mail messages” export option.
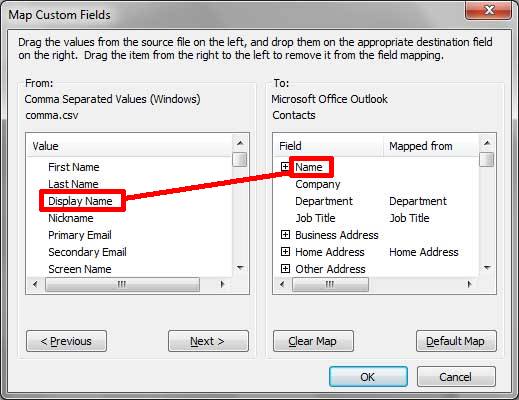
- Change the Map Custom fields if necessary.
- Finalize by clicking ‘Finish’.
- Close the Outlook client.
After you click ‘Finish’, all of your messages will land in the newly created file — check the folder to make sure. Note that both Microsoft Excel formats are suitable.
How to Open a CSV file
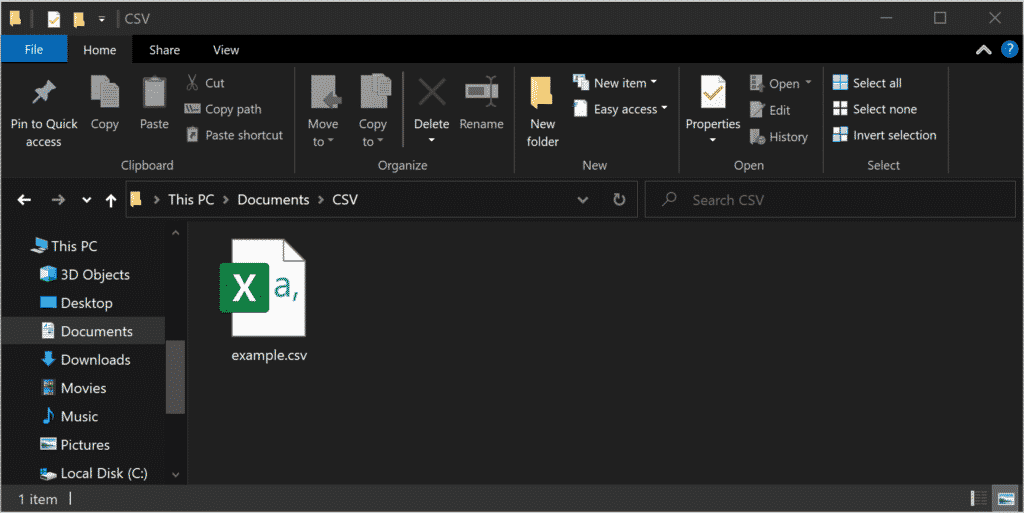
In the case of the CSV (Comma Separated Values) format, you can easily migrate to a spreadsheet. To do so, right-click the exported CSV file and select ‘Open with…’ from the context menu. The file will then open in Excel, where you can save it as an XLS file format.
The Direct Way to extract data from Microsoft Outlook emails
It is possible to transfer all emails from Outlook 2016 or any other version on a Windows or Mac computer in bulk. It is not necessary to export the data to a standalone file first. The following instructions will allow you to complete the task quickly via copy and paste:
- Open Outlook and enter the Mail view.
- Open the folder whose contents must be transferred.
- Copy all emails with or without text (see the tip below).
- Open MS Excel.
- Create a new spreadsheet file.
- Insert the copied emails — select cell A1 and paste using the standard ‘Ctrl + V’/’Command + V’ command to export Outlook emails.
- Save the file. on your Windows or Mac device.
How to Copy Emails for Microsoft Excel (Step 3)
There are two methods for importing emails in any version, including Outlook 2013, with or without the text. To preserve the contents, please follow all the steps below. To export without the text, please start from step 6.
Do the following:
- Deactivate the Reading Pane mode of Outlook via the ‘View’ menu.
- While still in View, click the Add Columns option.
- The new box called Show Columns allows you to select columns from ‘All Mail Fields’. Choose this option.
- In the ‘Available Columns’ list, mark ‘Message’.
- Finalize by clicking ‘Add’ and ‘OK’.
- Highlight the full mailbox contents in your open folder.
- Copy the Outlook data using the ‘Ctrl + C’ command.
Export Emails From Outlook to Excel with Date and Time
if you need to preserve the date and time details, use the copy & paste method. The Outlook system will allow you to view emails from a specific data range. The method is similar to ordinary direct copying. Here is what to do:
- Go to the search bar of Outlook 2010 or any other version.
- Enter the two dates defining the range.
- Click ‘Enter’.
- Highlight the emails with the date range (use the tip for Step 3 above).
- Copy the selection (Ctrl + C).
- Open MS Excel.
- Insert the copied data into an empty spreadsheet (Ctrl + V).
Congratulations! The messages with the specified time parameters have now been added to your spreadsheet. There is no need to search for any folders on our device — simply copy and paste directly. This basic method is used for specific types of analytical work. Please note that it does not generate an exported CSV file — instead, you save the spreadsheets after pasting the data. You now know how to export Outlook emails to Excel with date and time.
Final Words
The most common methods for transferring mail data from Outlook 2019 and previous editions to Excel are outlined below. If one or both of your systems are Macintosh, the sequence is similar .If you need to transfer the CSV file to another computer physically, you can use any external memory storage or save it to a cloud. You can also email it to your address for Mac.
If you need a backup, you can also export Outlook emails to a standalone PST file and save it to a safe location. The software will contain not just the messages, but also your contacts, tasks and assignments. You can also transfer emails from other mail clients directly into Outlook using a special converter that generates PST files. The data can be downloaded into a separate file or fed directly into your active profile in Outlook.
Frequently Asked Questions
How do I Export multiple emails from Outlook to Excel?
There are two popular ways to export outlook emails. The first way is to use the import/export function available in the desktop Outlook app, as the function is not available on Outlook’s web version. The export wizard offers hints as you export a file. But take note of two main settings. Make sure to select “Export to a file” and choose the file format as “CSV” instead of .pst. The latter format is mainly used as a backup file or for uploading emails to another outlook account. Rather than using the built-in function, the second method is to use a third-party solution that can extract emails from Outlook into excel supported format, such as .xlsx. You can utilize our Data Export Kit software as it offers an intuitive export wizard and supports multiple formats.
How do I copy and paste multiple email addresses from Outlook to Excel?
There are several ways to do this. For email addresses stored in Distribution or Groups, launch Outlook and select Contacts. Enable the List option to see available contacts and hold CTRL button and click on individual emails to copy them. Copy and then paste the contacts into the excel workbook. Secondly, you can manually export outlook email addresses using the Import/Export function. When exporting as a file, choose Comma separated values and choose Contacts. Thirdly, it’s possible to use a data extraction kit software that can extract contacts from PST files automatically.
Can I export my entire Outlook emails?
Yes, if you’re planning to import the outlook emails into another account by the same email service provider, you can use the Import/Export function. In the export wizard, choose “Outlook Data File .pst) as the format. The next step is quite easy. Select the folder to export from, for instance, Inbox or Sent Items. The only disadvantage of this method is that it doesn’t offer flexible formats. The best way to save emails from outlook which is more robust and flexible is by using a data extractor tool.
Can I extract data from an Excel attachment?
Yes, it’s possible to parse data from the attached Excel files. But you’ll need to use a third-party integration with a parsing function. Many users utilize Power Automate (formerly Microsoft Flow). They can parse the data and perform additional automated functions such as adding the data to a central database. Power Automate is not the only tool that offers this function. There are many other third-party integrations.
Can I connect Outlook to Excel?
Yes, users can create a bridge allowing them to automatically send automated emails from Outlook to Excel. However, there is no native function to do this. Users have to find external solutions provided by Microsoft such as Power Automate or other third-party integrations by providers such as Zaiper, Automate.io, etc.
Can I convert a PST file to Excel?
Yes, it’s possible to convert PST, a format utilized by Microsoft Outlook for storing its information, to an Excel file supporting rows and columns. For this operation, it’s necessary to find a conversion tool. There are many tools in the market from providers such as Cooltutilis, FileProInfo, Conholdate, and more. Many tools are free or may have a free trial period. We would recommend you to try the free version of Data Extraction Kit to automatically export PST items to the Microsoft Excel file.
How to Export an Outlook Email to Excel Manually?
-
- In Outlook click File then select Open & Export.
- Click Import/Export, choose Export to a file and click on Next button.
- Choose Comma Separated Values and click Next.
- Choose a folder containing emails to export, type a file name, and click OK.
- Specify a location to save CSV file and click Next, then click Finish.
